How to Export Outlook 365 Emails to PST on Mac & Windows?

Are you using Outlook 365 account whose emails you want to transfer into PST format for safety purposes? Wondering how to export Outlook 365 emails to PST on Mac with attachments easily? Searching for a trouble-free and effective solution to implement the required task? Not to worry, read the entire article and you will discover an approach which will successfully export Outlook 365 emails to PST on Mac accurately in few seconds.
For users working in an organization have to deal with plentiful emails throughout the day. These emails contain essential data that needs to be extracted for official purpose. Therefore, it should be saved in a personal folder that can allow easy data accessibility in case of poor internet connection or when the server connectivity is slow.
Hence, it is necessary to export Outlook 365 emails to PST file so that the data can be utilized for backup in a case of unexpected error occurrence in future. This can be done either making use of a manual method or automated method. So, in the blog we will discuss different approaches to export Outlook 365 email folder to PST. One is using eDiscovery Export Tool, second PowerShell command and third MacMister Office 365 Backup Tool for Mac. Now, without more ado, let’s get started.
Export Outlook 365 Emails to PST using eDiscovery and PowerShell
There are two manual ways using one can export Outlook 365 mailbox to PST. Let’s go through the steps one-by-one and implement the process accordingly.
Method 1. Export Outlook 365 Emails to PST using eDiscovery Tool
Step 1. Go to Exchange Admin Center and login using the credentials of Office 365 admin account.
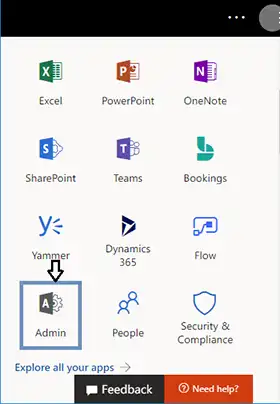
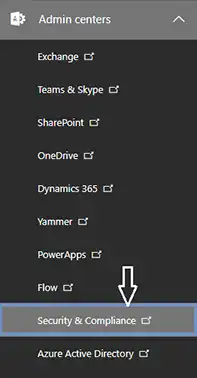
Step 2. Navigate towards Admin Centers and choose Security and Compliance button.
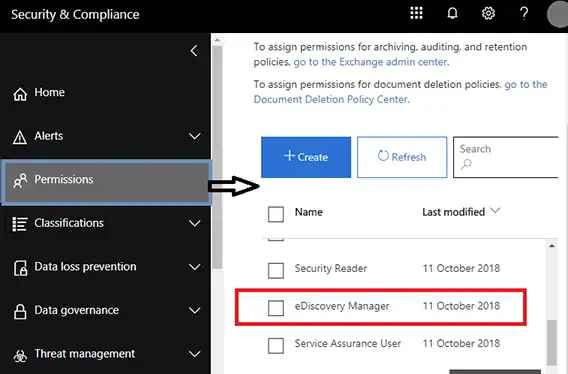
Step 3. Go to Permissions and click eDiscovery Manager.
Quick Note. You should be a member of eDiscovery Manager Role Group to access several other functionality.
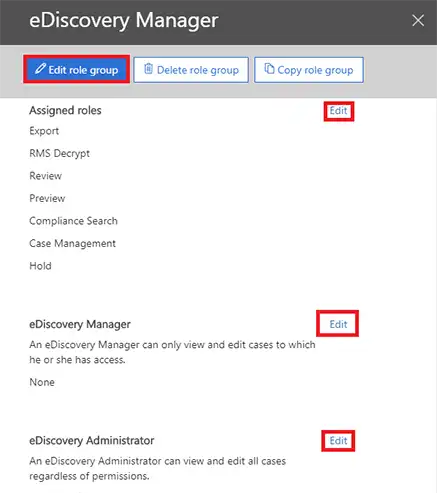
Step 4. Click on the Edit icon if you want to modify or add other main roles that are important for eDiscovery group.
Step 5. By default, role groups have some already assigned roles such as Compliance Search, Hold, Preview, Case Management, RMS Decrypt, Review, etc.
Step 6. In case you unable to find Export role, then use Step 5 to add suitable role.
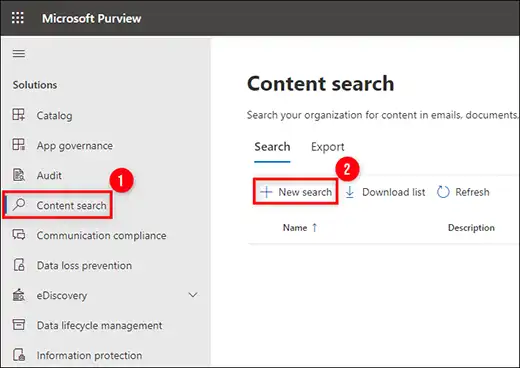
Step 7. Go to More Resources and click on the same. Now, all Microsoft resources will open on a panel. Navigate towards Microsoft Purview Compliance Portal and open it. Then, search for Content Search option and press New Search button.
Quick Note. If the Content Search option is not present then make sure to recheck eDiscovery Permissions. Changing these permissions require 24 hours to become visible.
Step 8. Another window will open; one can easily customize elements of Content Search. You can also specify a name as well as a description for the Content Search. Simultaneously, specify all required details including location that allows choosing required user accounts that need to be exported to PST files.

Quick Note. Here you should be aware that selecting all the locations with SharePoint Online and Public Folders Database can delay the eDiscovery process of exporting PST files from the Office 365 account.
Step 9. In the Conditions tab, you can set necessary Filters such as query language or region, keyword/phrases, and conditions including those associated with time, message fields & properties, etc. that allows selective export of PST files.
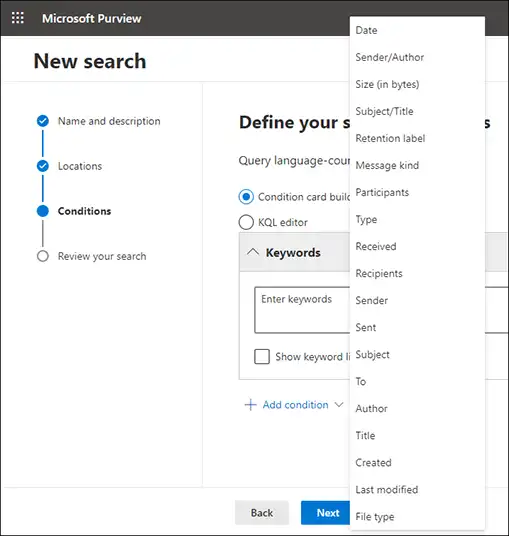
Quick Note. Do not set any conditions, keywords or filters if you want to export complete Outlook 365 mailbox data.
Step 10. After you done with the necessary customization, press Submit and click Done to initate eDiscovery quickly.
Step 11. This will start eDiscovery search in the background meanwhile, track the process by hitting Search tab.
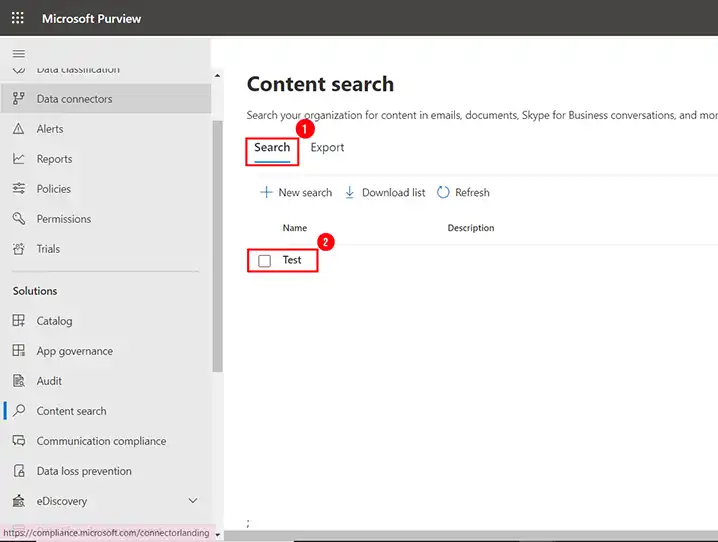
Step 12. You can now able to see the eDiscovery Search status as in-process or complete. After it gets completed, click Action tab and go for Export Results.
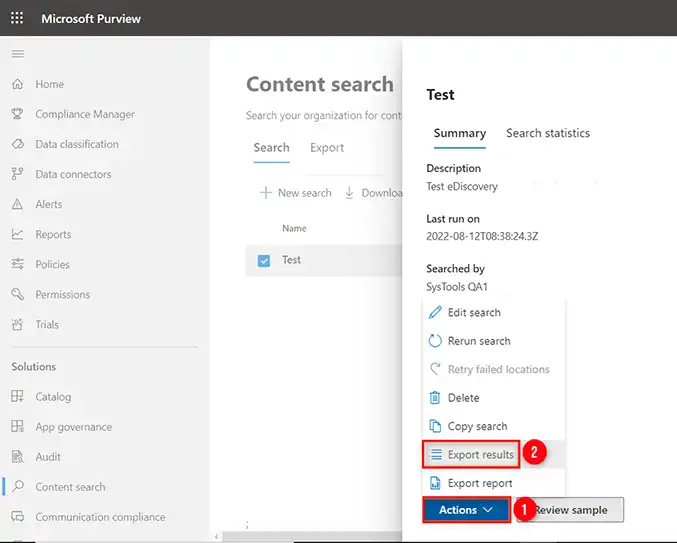
Step 13. Now go through the below window, you will get different settings from which you can choose specific conditions such as If you want to export encrypted files then include this option. Moreover, you can customize complete exported results before downloading it. However, in case you have no idea about these settings then it is advised to export the data using default settings.
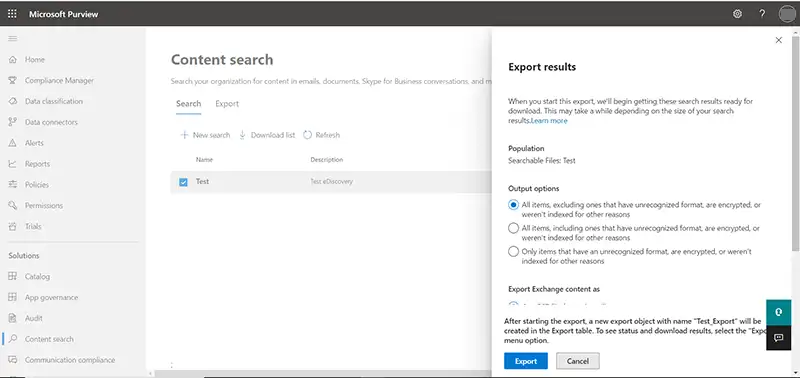
Quick Note. Ensure not to set Enable Deduplication option in case you need to Export the search results in one PST file.
Step 14. Press Export to start the process immediately. Then, navigate towards Export tab and reselect the Search to track the process status.
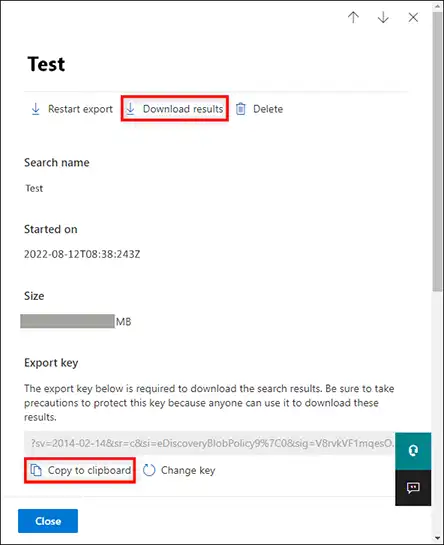
Step 15. After the process is successfully completed, click Close.
Step 16. When the process is finish, click Download Results button. Also, ensure to copy unique Export Key. Now, use the same key in ClickOnce extension when it shows Export Tool.
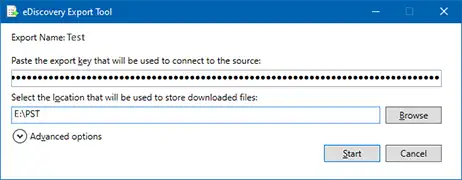
Step 17. Now, a pop-up appears which starts eDiscovery PST Export Tool, paste the earlier copied Export Key and specify the destination path where exported PST file is saved. At last, press Start button to initiate the process of Export mailboxes database into PST.
Limitations
- Lengthy and time-consuming steps.
- Expert’s support is must.
- Missed out of single steps can interrupt in process workflow.
- Only technical users can handle it.
Method 2. Export Outlook 365 Emails to PST using PowerShell Method
Step 1. Create Connection with MS Exchange Server via PowerShell.
To access PST files from Office 365, run the command mentioned below:
“$UserCredential = Get-Credential”
Now, enter the necessary credentials of Outlook 365 account that is mentioned under Windows PowerShell Credential Request Wizard.
Run the following command:
“$Session = New-PSSession –ConfigurationName Microsoft Exchange –ConnectionUri https://outlook.office365.com/powershell-liveid/ -Credential $UserCredential –Authentication Basic –AllowRedirection”.
Again run the below command:
“Import-PSSession $Session”.
Step 2. Permit Access Right to Mailbox to Export using Powershell
“Add-Mailbox-Permission – User xyz@domain.com – Identify xyz@domain.com –AccessRights FullAccess –InheritanceType All”.
Step 3. Open Microsoft Outlook to add new account
Now, open Outlook as xyz@domain.com and and make sure that xyz@domain.com is available in the mailbox appearing in the left pane. At times, the permission requires seconds or even minutes to be applied.
Step 4. Verify Configuration Settings in Outlook on Windows
Check if the Outlook configured in order to download all its emails in a limited time.
- Go to File, click info page >> choose Account Settings.
- Press Account Settings Again and choose the Account.
- Click Change Button and make sure that you use Use Cached Exchange Mode option.
Step 5. Export Mailbox into PST using Import/Export Wizard.
- Launch Import/Export Wizard to export xyz@domain.com data into PST file. To perform the same, navigate towards File menu, click Open & Export and choose Import/Export option.
- Choose Export to a File from the available list of options and then press Next.
- Select Outlook Data File(.pst) option and hit Next.
- Again select xyz@domain.com from the list appearing and hit Next. Ensure that the checkbox is selected of Include Subfolders.
- Specify new file name as well as destination path to save PST file i.e. c:\tmp\outlook-archive-xyz@domain.com -2020209.pst
- Go to the Option section, choose necessary option from the options given. Press Finish.
- Enter password in PST file if needed else leave it like this. Click OK.
- Now, Outlook will only operate after the process finishes. So, wait for few minutes until you able to access the account again.
Step 6. Make Sure that the Process is effectively Accomplished
To perform the same, verify the mailbox size stored on the server and compare the same with exported file size. Now, follow the steps:
- Go to the right-pane and right-click on a mailbox, then choose Data File Properties.
- Navigate to General tab and click Folder Size button.
- Choose Server Data tab and note down the mentioned value as a total size.
- Verify the exported PST file properties and make sure that the file size is comparable with the Total Size mentioned by Outlook.
Step 7. Outlook 365 Export Process Finishes
After successfully exporting Outlook 365 emails to PST, remove all the permissions applied earlier initially using Powershell. Run the below command to do the same:
“Remove-MailboxPermission –User xyz@domain.com –Identify xyz@domain.com –AccessRights FullAccess”.
Step 8. Exit from Powershell
At last, the Powershell session need to be shut down after all permissions are removed. Run the command for the same:
“Remove-PSSession $Session”
Limitations
- Time-consuming process.
- Only technical users can handle the steps.
- Not for Mac system.
Method 3. Directly and Trouble-Free Export Outlook 365 Emails to PST
Utilize MacMister Email Backup Software for Mac to batch export Outlook 365 emails to PST with attachments on Mac & Windows. It is simple, safe, and cost-effective. Anyone can independently handle the process and export unlimited Outlook 365 emails to PST with attachments at once. Simply provide the credentials of Outlook 365, choose PST as a saving option, and press Start Backup. By implementing these three easy steps, one will be able to quickly access Outlook 365 emails into PST.
Moreover, there are many features available in a tool that is useful to export Outlook 365 emails according to specific requirements. And, if someone wants to check the process, then it can be done using the free demo version.
Epilogue
In the write-up we have mentioned multiple approaches to resolve “how to export Outlook 365 emails to PST”. The first two methods are manual. So, it is advised to operate them under expert’s assistance. Also, they are suitable for Windows users. However, the third method works on both Mac & Windows. It has a time-saving steps and guarantees accurate results in a short time. Moreover, it has a trial edition that is useful in testing the process for free and even one can export first 25 Outlook 365 emails free of cost.