How do I Import PST Files into Outlook on MacBook?
How do I import PST files into Outlook on MacBook? Struggling with such similar issues? No worries, just go through the segment entirely and you will be able to successfully import PST files into Outlook on MacBook with emails, contacts, calendars, and other items.
Outlook is a popular platform that is available for both Mac & Windows OS. The only difference that one will find between both the Outlook versions is the file format. Windows Outlook has PST as its default storage file type and the Mac version of Outlook supports OLM files. However, both carry the same responsibility. They store the entire mailbox folders of the user’s profile such as emails, contacts, calendars, and other items.
Although, Outlook for Mac comes with an option of Import to import PST files. But, one can import a single PST file at a time. So, if a Mac user is carrying several PST files and trying to import them using the Import option, then the process will be time-consuming. Therefore, the best way to import PST files into Outlook on MacBook is to convert all PSTs into a single OLM file. Let’s see how!
How do I Import PST Files into Outlook on MacBook?
We have discussed two different approaches here to import PST files into Outlook on MacBook.
- Manual Method
- Automated Method
Method 1. Manually Importing PST into Outlook on MacBook
PST stands for Personal Storage Table and is a data file that is supported by Microsoft Outlook for Windows. It archives all email messages, contacts, calendars, tasks, and notes of the user’s account. In order to access the PST file in Outlook on MacBook, follow the steps mentioned.
Steps to Import PST into Outlook on MacBook
Step 1. Open Microsoft Outlook on a MacBook.
Step 2. Take your cursor to the Tools tab and choose the Import option.
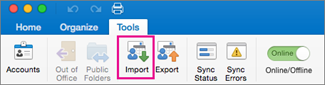
Step 3. Pick Outlook for Windows archive file (.pst). Click Continue.

Step 4. Go to the location where the .pst file is residing. Choose the same and click Import.
Step 5. The import process will start and quickly ends by enabling the Finish button on the screen. Click on it to stop the procedure.
Step 6. Import items will appear on the left navigation pane under On My Computer.
However, the process is for a few PST files. In case you are having large amount of PSTs, then it is recommended to opt for Method 2.
Method 2. Directly Import PST File into Outlook on MacBook
By using MacMister PST to OLM Tool, users can directly batch import PST files into Outlook on MacBook with all the data items. The application is simple, friendly, and secure. It contains an easy operational platform so that all types of users can utilize it without any challenges and import PST files into Outlook on MacBook effortlessly. The steps are also short and time-saving. They will instantly perform the process and gives accurate results in a minimum time.

Moreover, the application is built-up with very powerful features that users can apply as per their requirements to get the desired output. However, the free demo of the tool is available and one can take help to experience the conversion for free.
Working Steps to Import PST File into Outlook on MacBook
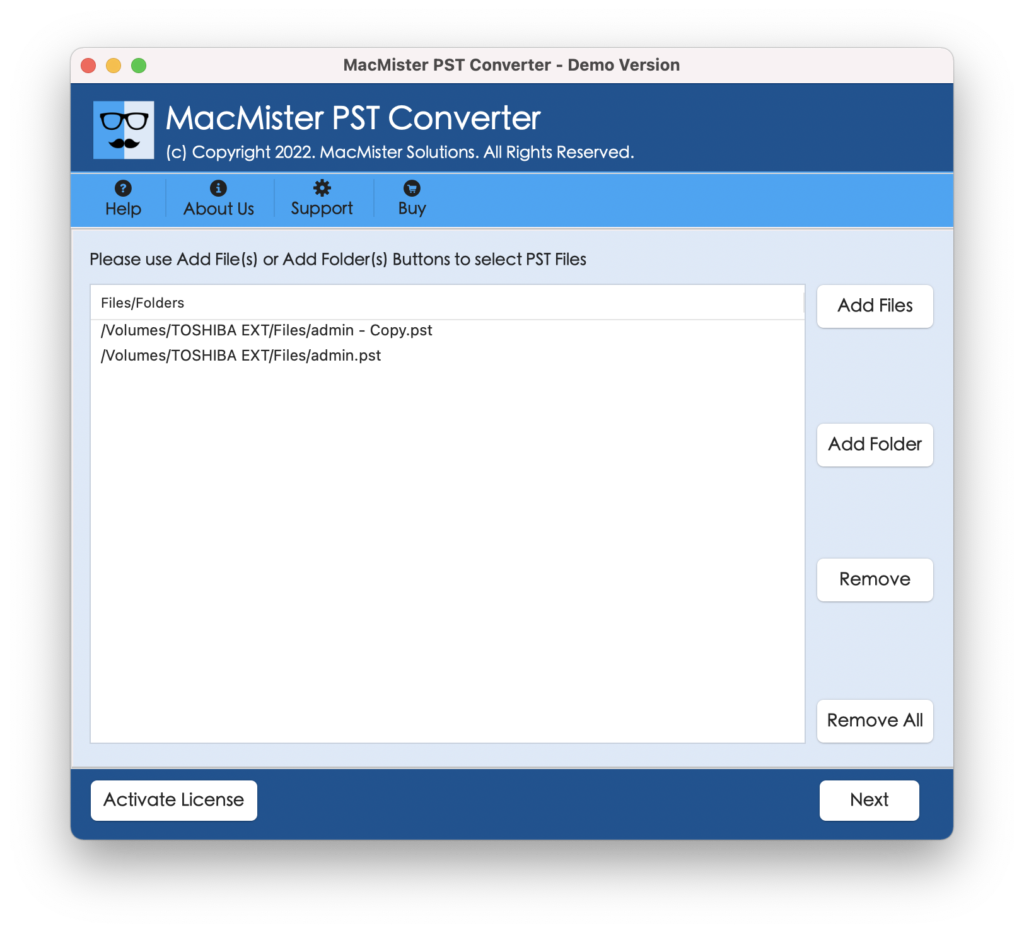
Step 1. Download and run MacMister PST to OLM Converter for Mac on MacBook.

Step 2. Add necessary PST files & folders on the app with the help of Add File(s)/Add Folder buttons. Click Next.
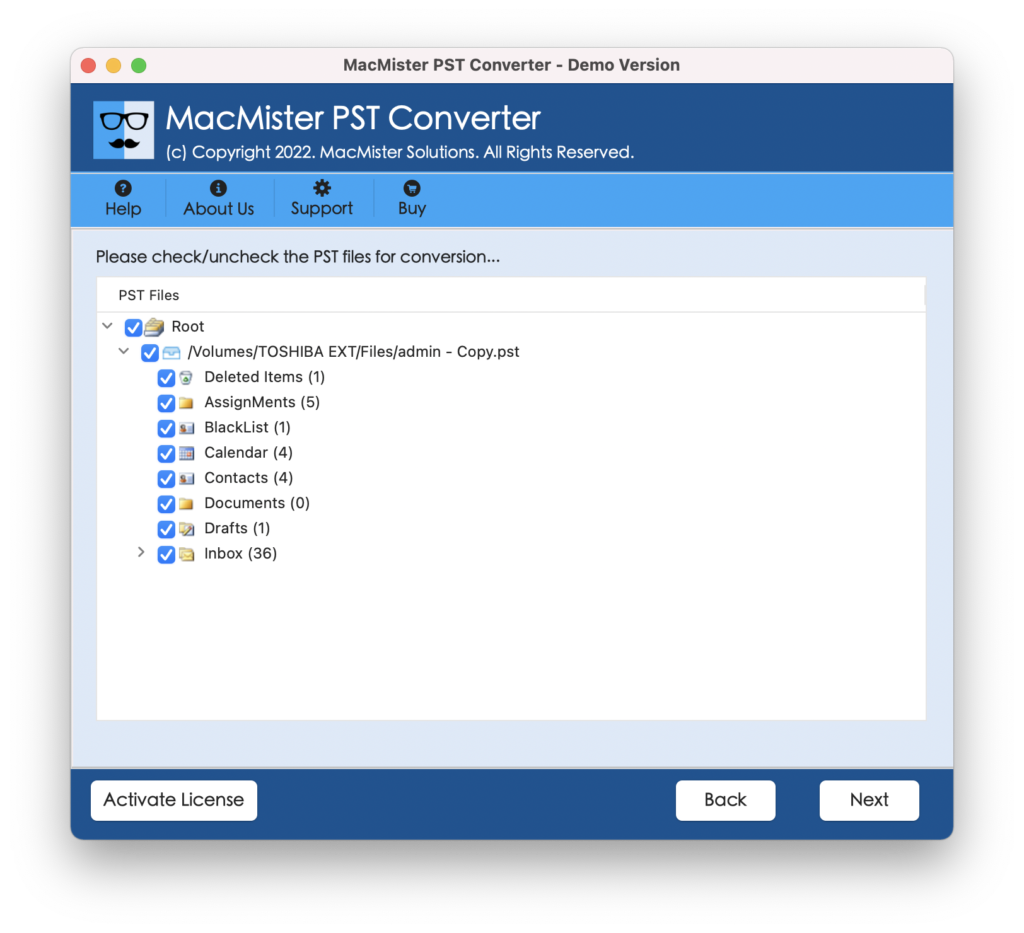
Step 3. The software now scans the selected PST files and lists them with checkboxes one by one on the tool. However, the checkbox can help you to import selective PST files into Outlook on MacBook, if needed. Click Next and continue further.
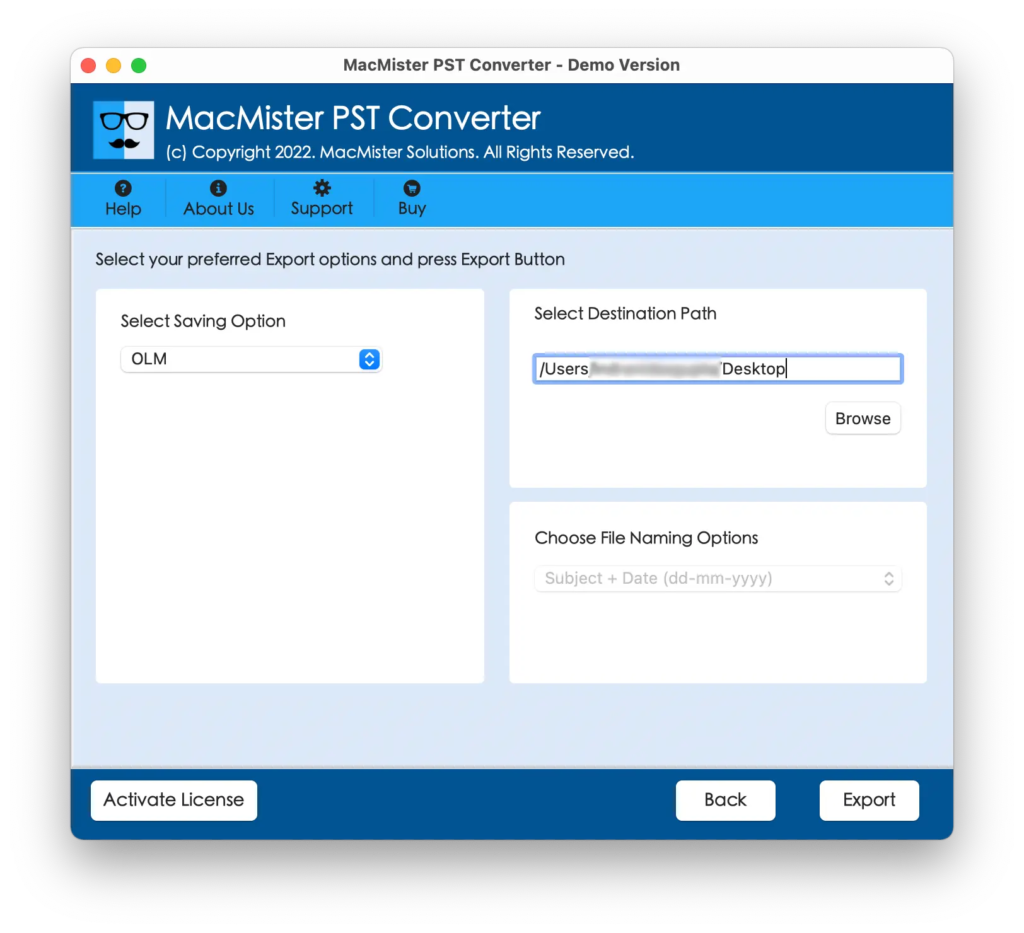
Step 4. Click Select Saving Options drop-down button and choose OLM format from its menu.
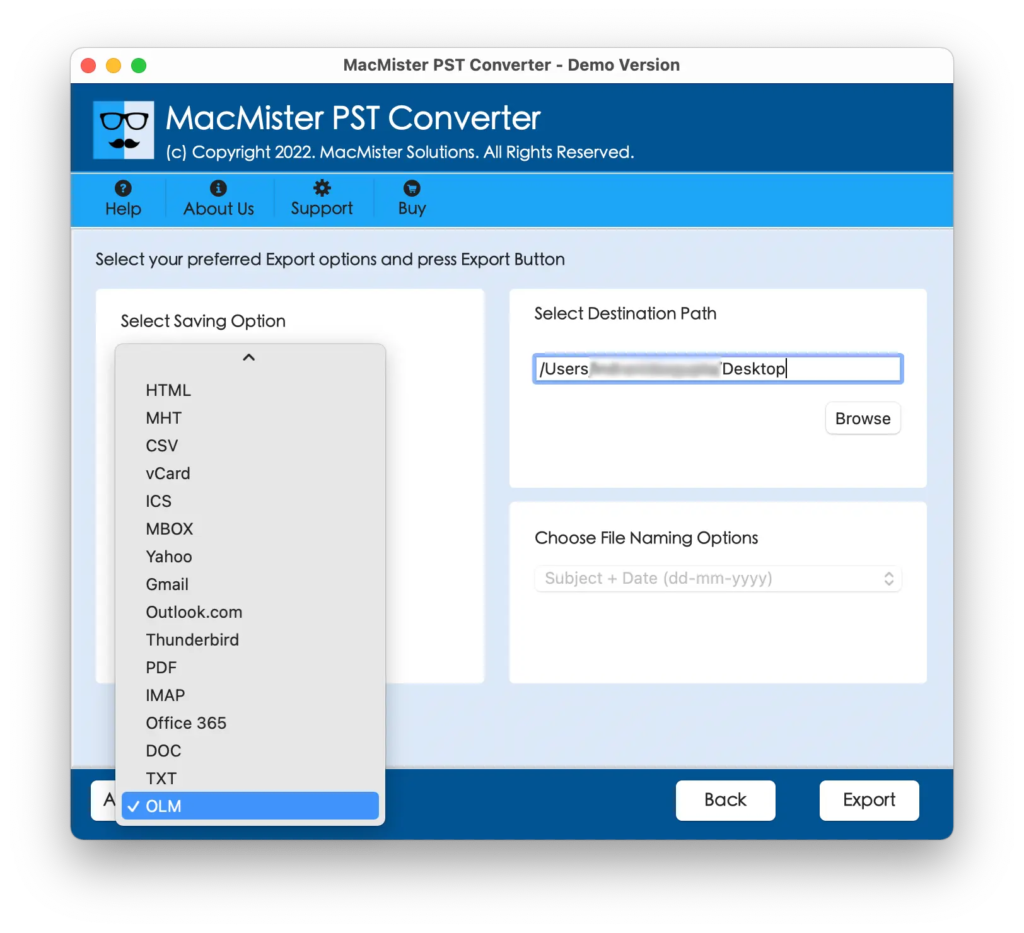
Step 5. Set the other OLM options as per your requirements and press the Export button to start the process.
Step 6. The process is live and you will be able to see the ongoing conversion progress of PST files appearing on the Live Conversion Window.
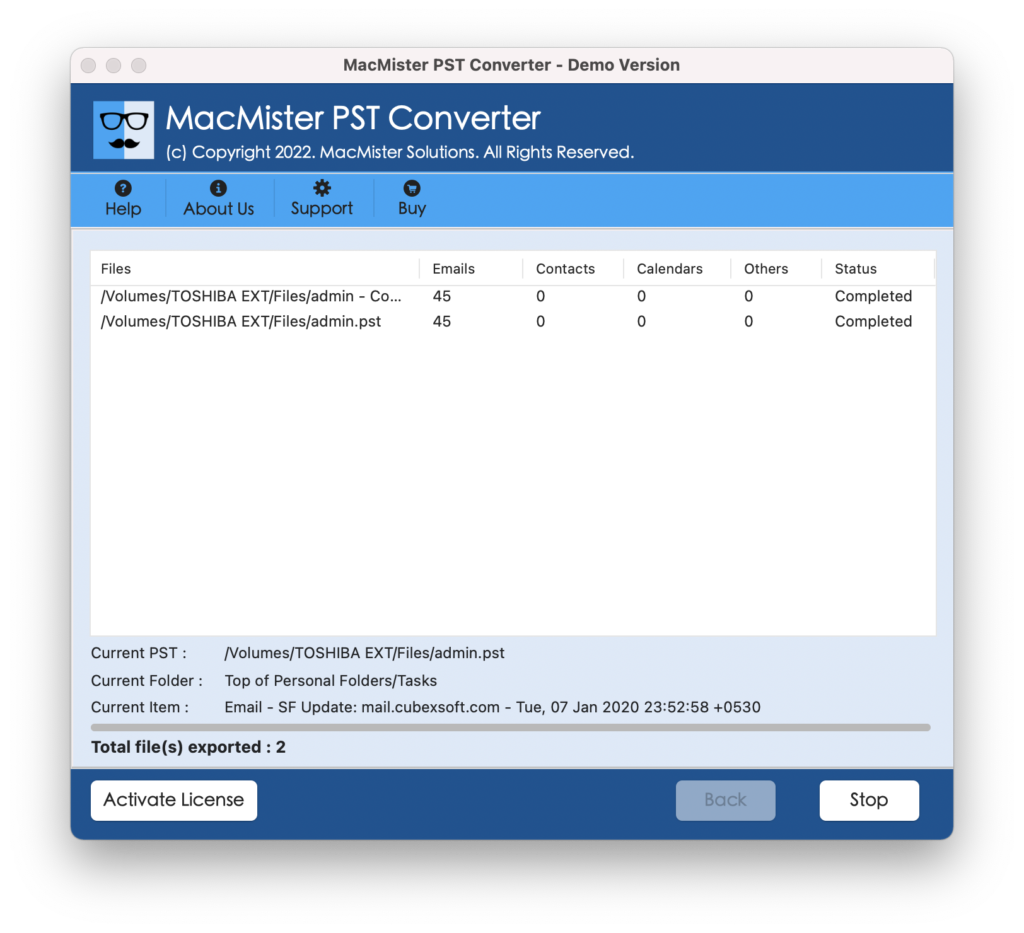
The entire procedure will take a minimum of time to end the process. After this, users will get Conversion Completed message on their screen. Click the OK button and go to your Outlook account to import the resultant OLM files.
Step-by-Step Process to Import OLM in Outlook on MacBook
Step 1. Open Outlook on a MacBook.
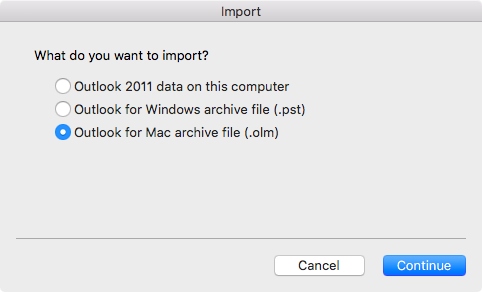
Step 2. Go to Tools and select Import.

Step 3. Pick the option of Outlook for Mac archive file (.olm). Click Continue.
Step 4. Navigate to the location where the resultant OLM files are saved. Choose them and click on Import.
Step 5. As soon as you click on Import, the process will start and within seconds the procedure will end and the imported items will appear on the left navigation pane under On My Computer.
You can open the data of a required file and check the result. However, you will see that the content is accurate and associated details are also precise.
Quick Note. Use Method 2 to import PST files not only in Outlook on MacBook but also in other file formats. It includes MBOX, PDF, MSG, EML, HTML, MHT, HTML, CSV, IMAP, Office 365, Gmail, G Suite, Thunderbird, and more.
Why to Choose Method 2?
There are several reasons that tell why Method 2 is beneficial. Some of them are:
- Directly import PST files into Outlook on MacBook within seconds.
- Capable to import PST files with emails, contacts, calendars, and other items.
- Allows to save the resultant imported file at the desired location on macOS.
- Maintains the originality of the PST file database and delivers the result with accurate formatting properties and folder structure.
- Launched with dual buttons i.e. Add File(s)/Add Folders to add necessary PST files or folders on the software for conversion.
- Includes a friendly GUI that is operable by all professional and non-professional users.
- Allow users to import PST files into Outlook on MacBook (all macOS versions such as Ventura, Monterey, Big Sur, Catalina, High Sierra, etc.)
Epilogue
The write-up has offered two methods to import PST files into Outlook on MacBook. Method 1 is a manual procedure and can take a lot of time and effort as one can import one PST file at one time. Method 2 is an automated process i.e. Mac PST Converter that is safe to use, direct and time-saving. It can be managed by everyone easily and allows to perform the process according to specific requirements. However, it has a free demo as well with the help of users can understand the entire conversion steps and even import the first 25 files from each PST folder to Outlook on MacBook free of cost.
Quick Note. You can immediately contact MacMister Support for software assistance.