How to Add Bluehost Email to Apple Mail? – [EASY TUTORIAL]
Bluehost email server is simple, friendly, and has all the essentials that are important for email management. Apple Mail, on the other hand is a desktop-supported email client and thus built with different functionality and features. So, adding Bluehost email to Apple Mail is a complex procedure. And, in case you are one of those users who is constantly on a look out for a solution to fix how to add Bluehost email to Apple Mail on Mac or Windows, then not to worry anymore. Here we have explained different approaches that will help you to add Bluehost email to Apple Mail without any trouble.
Method 1. Manually Add BlueHost Email to Apple Mail
Follow the instructions correctly and quickly add Bluehost email to Apple Mail account:
Add a New Account
Step 1. Open Apple Mail and go to Mail menu appearing at the upper left corner of the screen.
Step 2. Click Preferences.
Step 3. Go to Accounts icon present in Mail Preferences window.
Step 4. From Accounts, tap + (plus icon) to create new email account.
Account Settings
Step 1. Select Other Mail Account option from Mail account providers.
Step 2. Enter your Full Name, email ID(xyz@domain.com), and password.
Step 3. Click Next button.
Incoming and Outgoing Mail Server Settings
While entering Incoming Mail Server, you should decide if you would like to use POP3 or IMAP. POP3 will download and remove all the server’s emails whereas IMAP will help in synchronizing the email between email client(s) and the server. However, IMAP should be selected if you are using an email account with multiple devices since they all can be synchronized.
IMAP Server Info
- Account Type: Select IMAP or POP
- Mail Server: mail.example.com, the example.com will be your domain name.
- User Name: enter full email address (xyz@domain.com)
- Password: add the password of specified account
- Configure Incoming/Outgoing email server.
- After the configuring Incoming Server Settings, make sure to set SMTP (Outgoing Mail Server).
- Tap Server Settings button. A message will be prompted on the screen asking to further set up Outgoing Mail Server.
- Provide Outgoing Mail Server one more time.
- Select Server Port.
- Choose the password to authenticate your account.
- Enter full email address again as a User Name and password for email account.
- Lastly, tap OK button.
SSL Certificate Warning
After choosing use SSL option, a warning message will appear on the screen saying that the certificate is not trusted. If you encounter this pop-up, follow the steps:
- Tap Show Certificate button.
- Select Always trust checkbox.
- Click Connect.
Complete Configuration Steps on Yosemite OS
It is advised to follow these steps to make sure that your account settings don’t change in case you are using Yosemite.
- Navigate towards Mail in Apple Mail and choose Preferences.
- Click Accounts.
- Tap Advanced.
- Deselect “Automatically detect and maintain settings”.
- Click Account Information tab.
- From Outgoing Mail Server, click Edit SMTP Server List.
- Tap Advanced tab.
- Deselect Automatically detect and maintain settings.
- Lastly, tap OK.
Method 2. Direct Approach to Add BlueHost Email to Apple Mail
The direct way to add Bluehost email to Apple Mail is MacMister Email Backup Software Mac & Windows. The software has 30+ email servers, Bluehost is one of them. Users can select it, add the credentials and convert all Bluehost emails into MBOX. Later, one can import the converted files into Apple Mail. The software has a friendly and a simple operational environment. Both technical and non-technical users can operate the application independently and smoothly add Bluehost email to Apple Mail within seconds.
Moreover, the tool supports incredible features with the help of users can execute the process according to the requirements. However, it is suggested to take help of the software trial edition to know the functionality and features of the application for free.
Working Steps of the App to Add Bluehost email to Apple Mail on Mac
Step 1. Download and run MacMister Bluehost to MBOX Converter for Mac on a Mac OS.
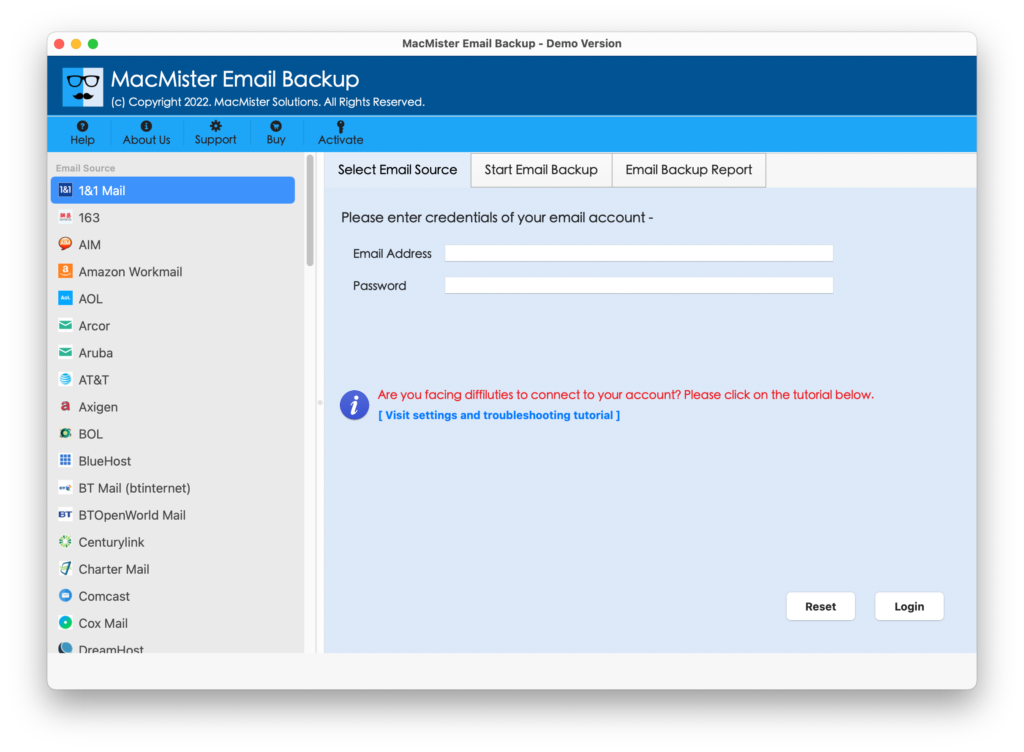
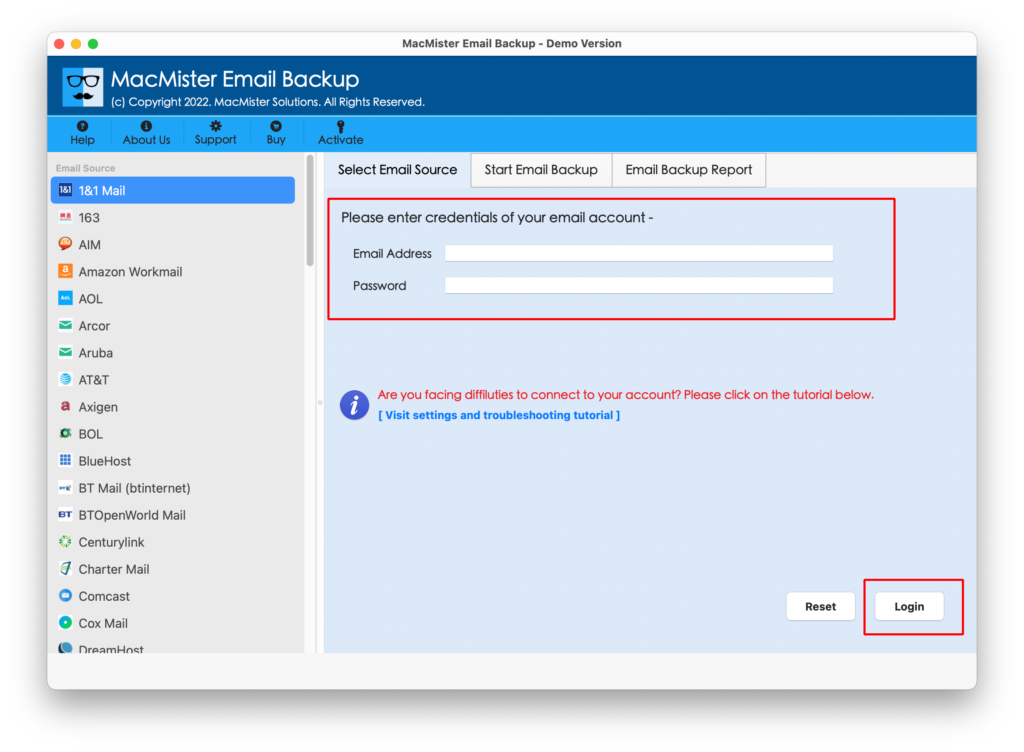
Step 2. Select Bluehost option from the left. Add Bluehost credentials. Click Login button.
Step 3. After Bluehost account is connected, the tool start listing its mailboxes on the left pane.
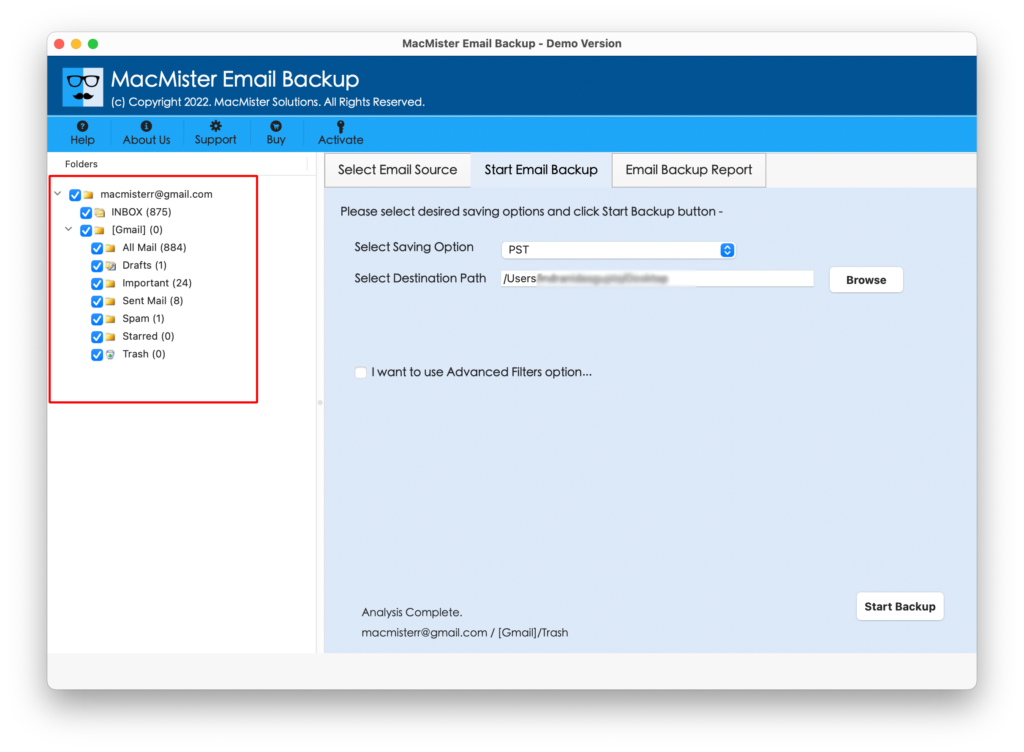
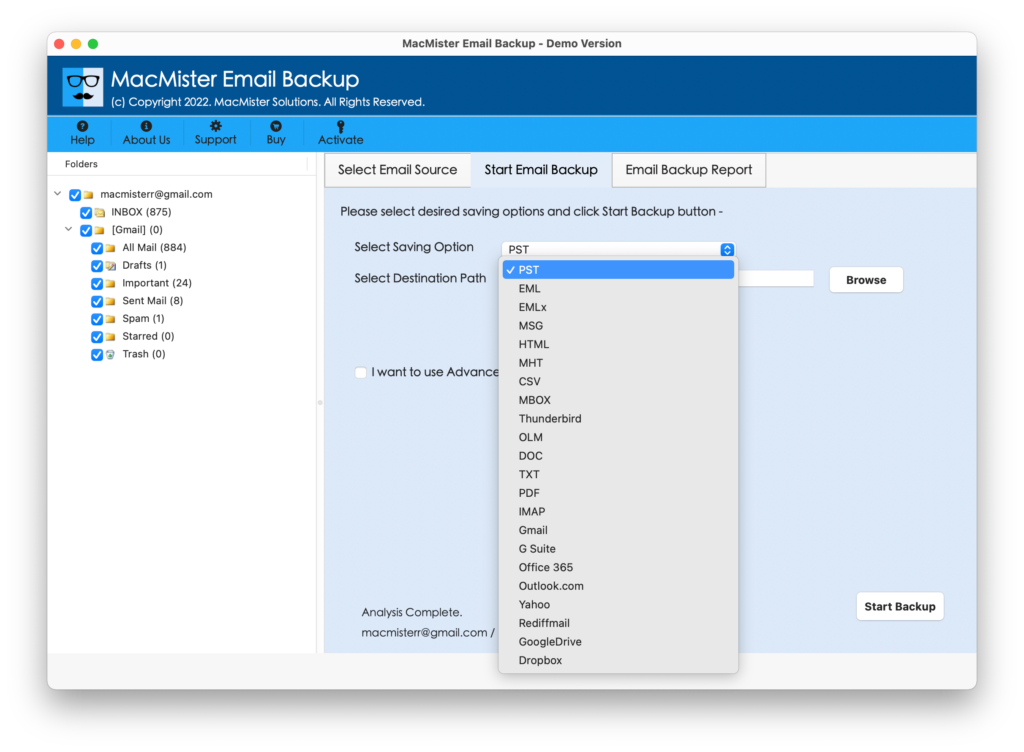
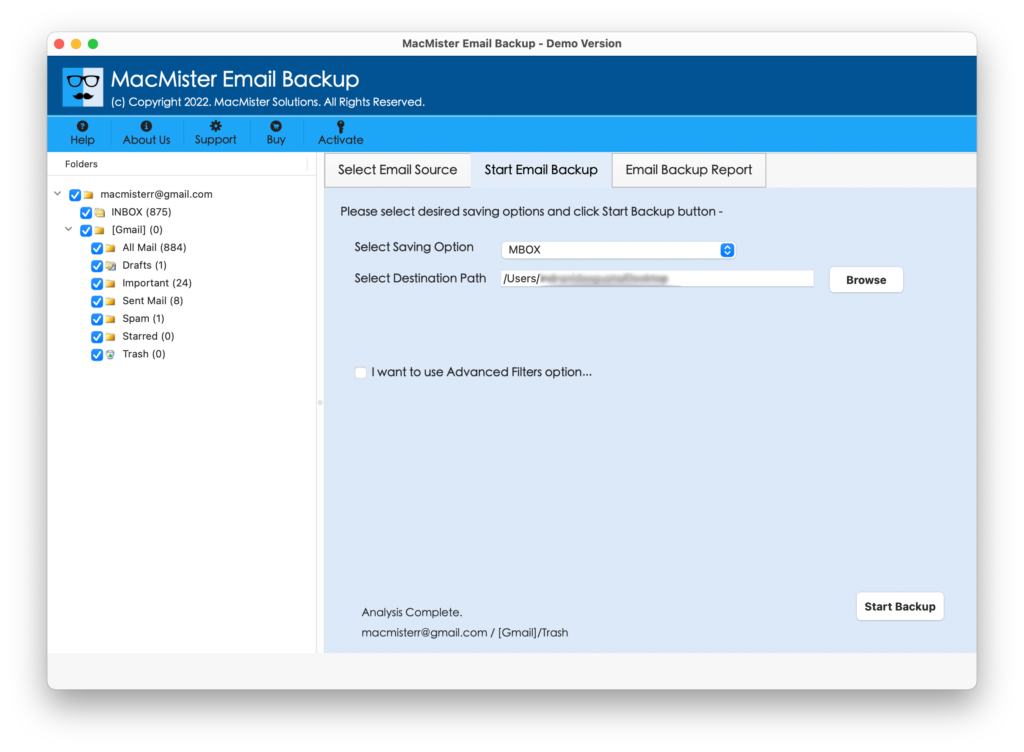
Step 4. Go to the right-side of the application, click Select Saving Options and choose MBOX from the list.
Step 5. Set MBOX sub-options, make use of required filter (if needed) and click Start Backup button.
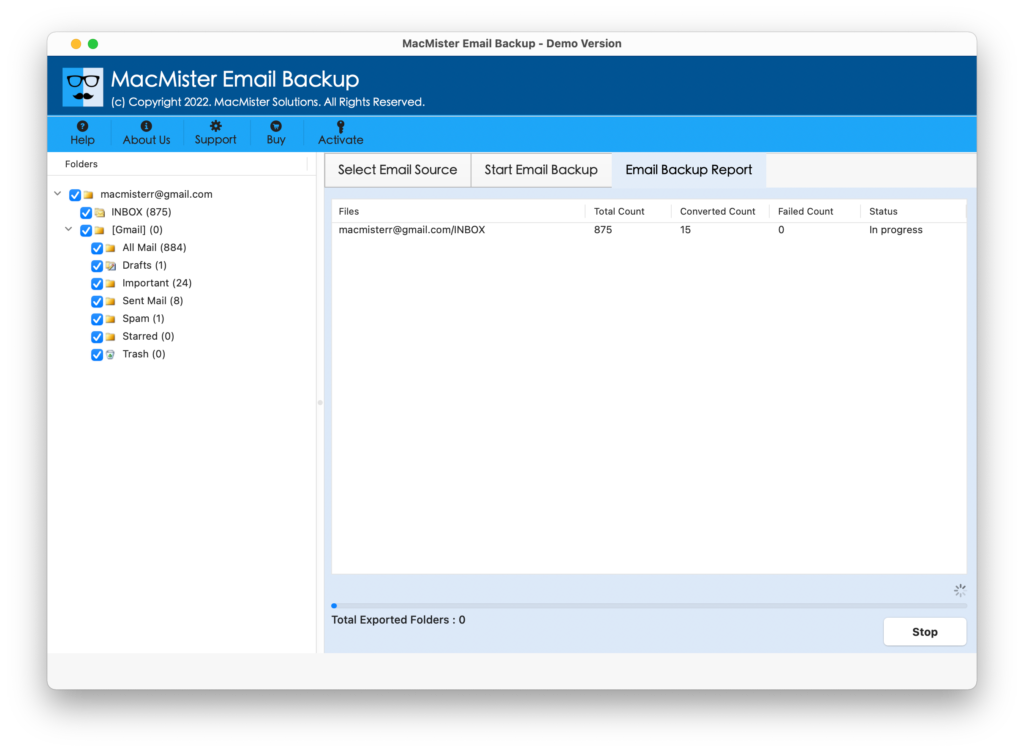
Step 6. The tool will show Email Backup Report window on the screen that users can use to check live conversion progress of Bluehost emails to MBOX.
Once the conversion is done, now go to Apple Mail account to import resultant files. To perform the same, follow the below steps –
Step 1. Run Apple Mail on your Mac.
Step 2. Go to File and click Import Mailboxes…
Step 3. Select the option “Files in MBOX Format”.
Step 4. Click Continue.
Step 5. Locate MBOX files, select them and click Choose.
Step 6. In few seconds, the import process will finish.
A new import folder will appear on the left pane of Apple Mail under On My Mac. When you double-click on it, the Inbox sub-folder will appear with the total count of files converted. Click on the same to list the emails on the screen. Now, go to the required email file to view the result. You will see that the content hasn’t affected during the process. Even, the layout will appear correctly after the conversion.
So, this is one of the easiest and fastest techniques to add Bluehost email to Apple Mail.
Epilogue
In the write-up, we have provided the multiple methods to add Bluehost email to Apple Mail account. The first method is manual and free to use. But the steps are complicated and lengthy that will make the process time-consuming for a lot of users. Also, non-technical users will not able to implement it as one should have a technical knowledge of Bluehost and Apple Mail email accounts. The second method is paid but offers trial edition. The steps are easy and simple. Users only need to add Bluehost credentials in the required fields and after clicking the Login button, the tool will show its mailboxes and allows you to choose Apple Mail supported format i.e. MBOX from Select Saving Options. Apply the sub-options and click Start Backup button. Within seconds, the tool will convert Bluehost emails into MBOX in order to add Bluehost email to Apple Mail. It also has a freeware version which one can download for free on any macOS and add first 25 Bluehost emails to Apple Mail free of cost.