Outlook for Mac Rules are not Supported for this Account – [SOLVED]

Dealing with Outlook for Mac rules are not supported for this account error? Searching suitable approaches for the same? Not to worry, simply follow the article and hopefully you will be able to resolve the issue easily.
Outlook contains several unique features which makes the app a popular email application. The Rules feature allows to automate for incoming email messages. One can say it is loved by millions of users. However, lot of people receive “Rules are not supported this account” error message on their MacBook or any other Mac OS platform. If you are one of those users then keep reading further as there are some fixes discussed that will resolve the issue quickly.
Quick Note. Download MacMister OLM Converter for Mac to export Outlook for Mac folders into 15+ options. The app will help to export OLM files into commonly used file saving options such as MBOX, PST, EML, EMLx, MHT, HTML, DOC, IMAP, G Suite, Outlook.com and more. Download free demo now and test the software steps for free.
Outlook for Mac Rules are not Supported for this Account – Popular Fixes
Method 1. Move back to old Outlook for Mac Profile
Microsoft no longer offers Client Rules property in Outlook for Mac email application. One can only benefit from Server Rules. However, this transformation applies to all new versions of Outlook for Mac. But, if you want you can switch back to legacy Outlook for Mac version and make use of Client Rules.
Steps to Switch Back to Old Outlook for Mac Version to use Client Rules
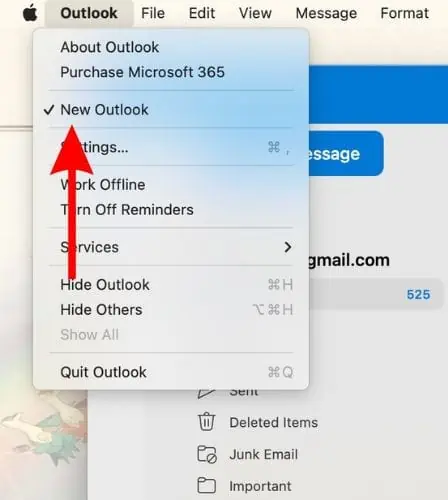
Step 1. Open Outlook on your Mac.
Step 2. Go to Outlook option appearing on top-left menu of the Outlook email account screen and deselect New Outlook option.
Step 3. If you see feedback window, mention the feedback and hit Submit button to tap Cancel.

Step 4. Click Revert to confirm the selection.

Step 5. Alternatively, you can go to Help option and select Revert to Legacy Outlook Option.

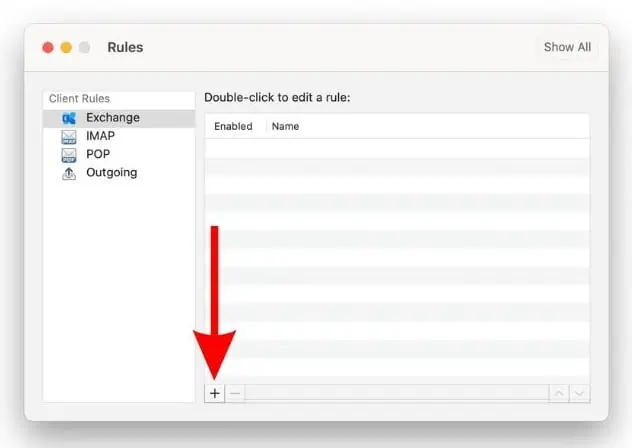
Step 6. The Outlook will restart and show legacy Outlook interface. Go to Tools appearing in the menu bar and select the Rules… option.

Step 7. Click + Add button appearing at the bottom in Rules window.
Step 8. Apply the settings in the next window as per your requirements and tap OK button to save all the changes.

Method 2. Use Outlook Web to Set Rules
You can set Outlook Client Rules by making use of a web browser. But you still need to use legacy Outlook for Mac to make Client Rules work on the app. However, here’s how you can configure Client Rules in Outlook.com.
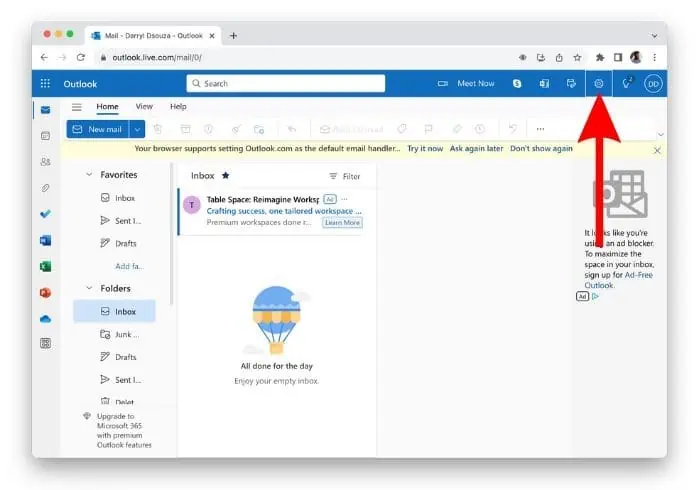
Step 1. Go to Safari (use any web browser), navigate to Outlook.com and sign-in to your account.
Step 2. Click Settings icon appearing at the top-right of the Outlook window.
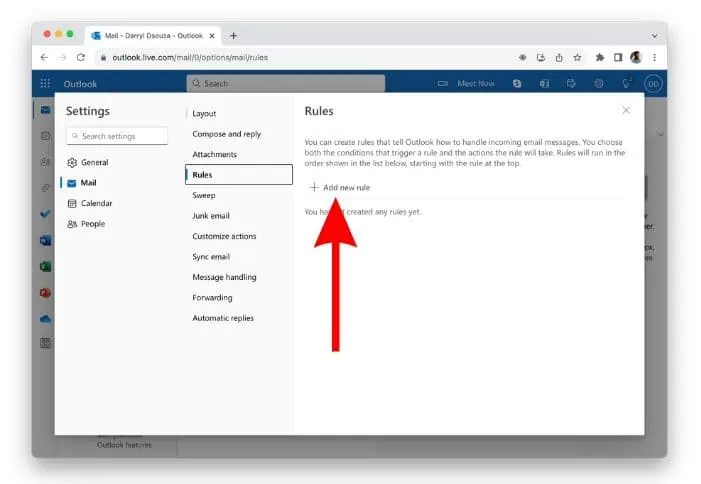
Step 3. Select Rules option present in Mail Settings.
Step 4. Tap + Add new rule option.
Step 5. You can set up all the settings and click Save button.

Method 3. Force Quite and Restart Outlook for Mac
At times, after moving back to legacy Outlook version, Client Rules need to be fixed on Mac. In that case, it is suggested to force quit Outlook for Mac email app and restart it on your Mac.
Step 1. Click Apple logo present at the top-left in the menu bar and select Force Quit Outlook option.
Step 2. Select Microsoft Outlook option from the list and click Force Quit.
Step 3. Last, hit Force Quit again to confirm.

Step 4. The quit process will take few minutes and after that open Outlook again.
Now, check if the Client Rules are now working or not in your Outlook on Mac. If not, move to next step.
Method 4. Delete and Create Rules in Outlook Again
If none of the above method works, then this is the last option you can opt. The option allows deleting the existing Client Rules and recreating them. However, it is a time-consuming process if you have several Client Rules. Follow the steps to delete and recreate Client Rules in Outlook on Mac.
Step 1. Open Outlook profile on Mac.
Step 2. Go to Tools and select Rules… option.
Step 3. Select the required Client Rule to delete from the list of Rules and click on –Remove appearing at the bottom.
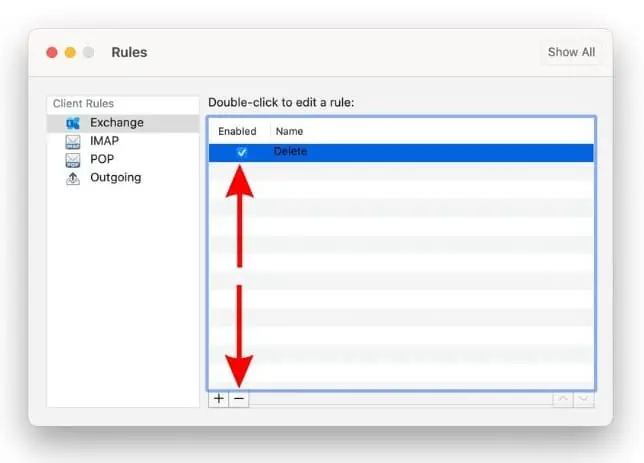
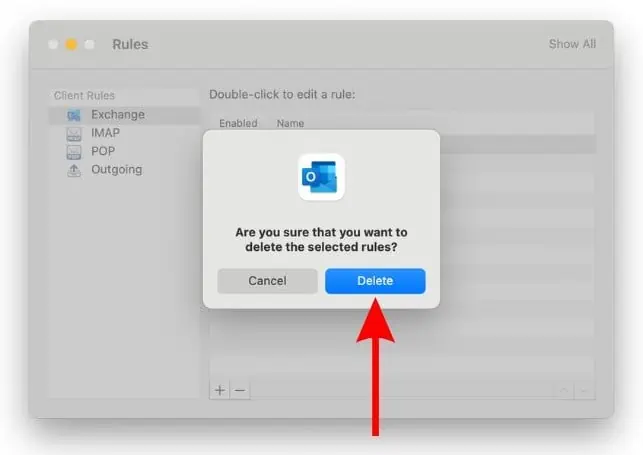
Step 4. A pop-up will appear asking to tap Delete to confirm.
Step 5. Repeat the steps for all the Rules.
Step 6. Click + Add icon on the Rules window.
Step 7. Apply the settings and click OK to save the changes.
Step 8. Repeat the process for each Client Rule you need to create.
Conclusion
We hope, the article will help you to fix “Rules are not supported for this account” error on your Mac. In case you have missed any troubleshooting method or have any doubts related to the issue, then contact MacMister Support.