How to Permanently Delete Data from MacBook?
If you move your file to the Trash and select “Empty Trash,” you would assume that all traces of that data have been erased. However, the truth is that all that the macOS system has done is to delete all references to those files and make their space available for writing. Until overwritten by new data, the file will remain intact.
Regardless of whether you plan to resell your MacBook, recycle it, or deal with sensitive material, making sure that all traces of your data are wiped away is imperative. In this complete guide, learn how deletion of data works on today’s MacBooks and how to do it safely.
Understanding the Tech: HDD vs. SSD
To begin with, it is crucial to be familiar with the storage used in one’s MacBook since that will determine how to go about the deletion process:
- Legacy MacBooks (Pre-2015): Used Hard Disk Drives (HDDs). Since HDDs store information using magnetic signals, the old data can simply be written over with random 1s and 0s to erase it.
- MacBooks Today (2015-Present): Have Solid State Drives (SSDs). The current generation of MacBooks, particularly those featuring Apple Silicon chips (M1, M2, M3, M4) or Intel T2 Security chip, automatically encrypt all data.
Due to SSDs’ way of distributing data (wear-leveling), “secure overwriting” techniques will not work. They will potentially cause harm to the drive, making cryptographic erasure necessary to permanently erase data.
Method 1: The Daily Routine (Standard Safe Deletion)
In the case of normal situations where the purpose is to ensure that the file is actually removed (and not temporarily kept in the virtual trash can), follow these steps:
- Bypass the Trash Can: Choose the files or folders that need to be deleted.
- Use the Short Cut Keys: Use Option + Command + Delete keys.
- Conform to the Action: There will be an option to see whether you want to delete the file immediately; press “Delete.”
All these steps ensure that the file or folder is immediately deleted. There will not be a use for space within the SSD.
Method 2: Erase All Content and Settings (The Best Method for Modern Macs)
If you use a new MacBook with Apple’s operating system called Monterey or a newer version with either Apple Silicon or Intel chips and the T2 security chip, then Apple provides you with the same function available on your iPhone. This function employs a process of cryptographic erasure, which is the destruction of encryption keys.
For macOS Ventura, Sonoma, and Later:
Click the Apple Menu button that appears at the upper left corner of your desktop screen and choose System Settings.
- Select the General category on the left pane and then click Transfer or Reset.
- Click Erase All Content and Settings.
- Enter the login information for your administrator account.
- Time Machine Backup Warning: You need to back up the files before erasing them. If you’ve already done so, click Continue.
- The Apple ID, Touch ID setup options, accessories, and Wallet content can be removed. Press Continue.
- Log out of iCloud and Find My Mac using your Apple ID password.
- Finally, press the Erase All Content & Settings button. You should see a black screen during the process of resetting the Mac.
To reset the Mac for macOS Monterey:
- Go to the Apple menu and select System Preferences.
- From the menu bar at the top of your screen, click on System Preferences beside the Apple logo.
- Click on “Erase All Content and Settings”.
Method 3: Using Disk Utility in Recovery Mode (For Older Intel Macs)
If you have an older Intel-based MacBook that doesn’t have a T2 chip or you are using an old OS, then the drive needs to be formatted manually with the use of Disk Utility through the process of macOS Recovery.
Step 1: Booting in Recovery Mode
- Intel Mac: Shut down your Mac. Turn on your Mac, and at the same time hold down the keys Command and R until you see the Apple logo.
- Apple Silicon Mac: Shut down your Mac. Hold the power button until you see “Loading startup options.” Click Options then Continue.
Step 2: Wipe the Drive Securely
- Launch the Disk Utility from the macOS Utilities window and click Continue.
- Click on your primary hard drive (which will be named Macintosh HD) in the sidebar of the disk utility window.
- Click the Erase button which will be found at the top of the Disk Utility window.
- Optional: If you are on an HDD and not an SSD, click Security Options where you may slide the lever depending on the number of wipes (2 passes or 7 passes) which comply with the DoD standards.
- Choose a Format by selecting either APFS or Mac OS Extended (Journaled). This depends if your version of macOS is newer than High Sierra.
- Click Erase and close Disk Utility after it has finished.
Warning: This process completely removes the operating system. If you plan to keep the MacBook, you will need to select Reinstall macOS from the Utilities window before restarting.
Method 4: Permanent Deletion via Terminal (Advanced)
In case of more advanced users that want to delete a very precise file/folder safely while not having to delete everything on their computer, macOS Terminal offers an option.
Please note: The srm command, used for secure deletion in older macOS versions, is no longer recommended as it negatively impacts the lifespan of SSDs. However, you may still use the regular rm command with the -force parameter to bypass the trash graphical user interface entirely.
Step 1: Open Terminal (by using Spotlight search or Applications > Utilities).
Step 2: Type rm -R (please remember to leave a space between -R and whatever comes next).
Step 3: Drag-and-drop your specific file/folder onto the opened Terminal window from Finder. This will insert its path into the command string.
Step 4: Press enter. Your file/folder is immediately removed from the file system.
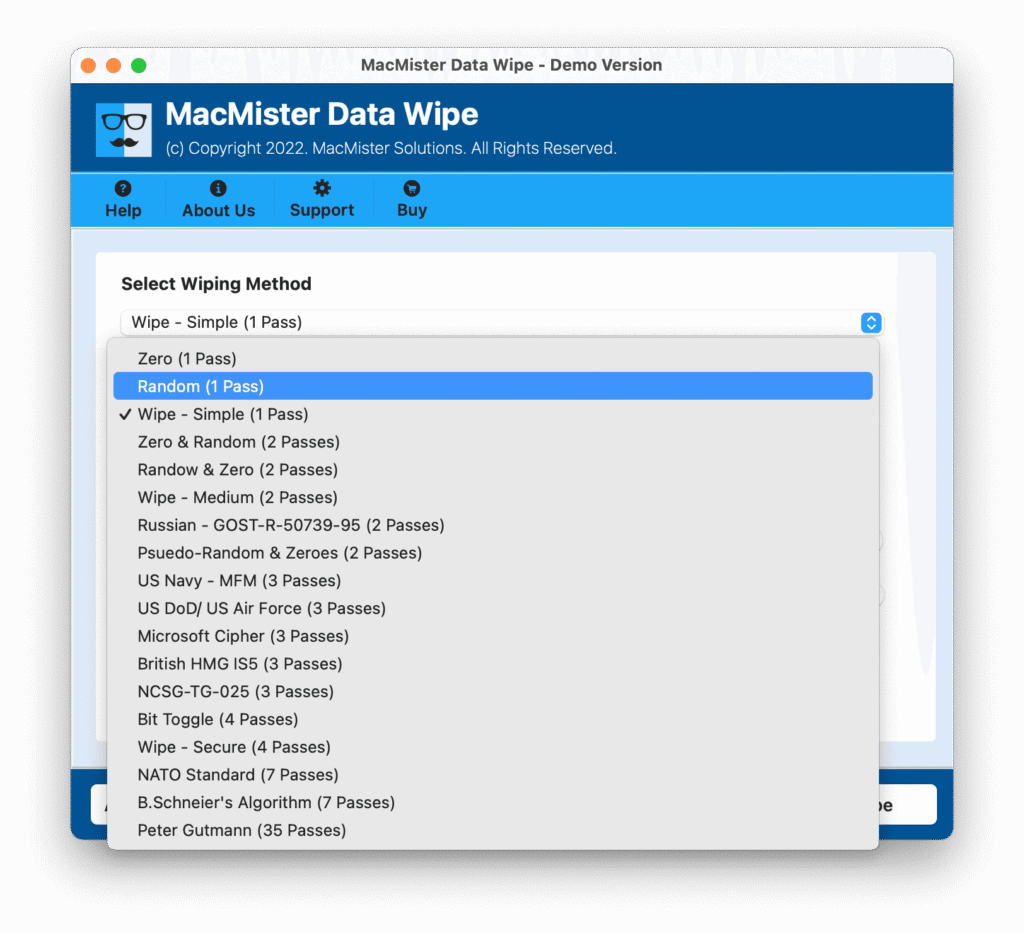
Try Professional Approach
There are some professional approaches also available that will help in deleting data permanently from MacBook. MacMister Data Wipe Software for Mac is one of them. It is a dedicated program for the complete erasure of all files and folders from the hard drive on the Macintosh operating system. The tool makes sure that the deleted information will not be accessible using any other forensic/data recovery software program, thus making it very helpful when getting rid of your old Mac.
In addition, by fully depending on external file destroyers for contemporary Mac systems, the best way of maintaining data privacy is by ensuring that the FileVault option is always active.
Checking If FileVault Is Enabled:
- Navigate to Settings > Privacy & Security.
- Scroll until you see FileVault.
- Confirm it is enabled.
If FileVault is enabled, then everything on your drive will be encrypted. When you delete any files or when you reset the computer, the data stored underneath becomes safe from any reading.
Summary Checklist for Selling Your Mac
When you intend to dispose of your data through permanent deletion in preparation for giving away your MacBook, deleting the data on your storage drive isn’t enough. Here is a short list of things you should do:
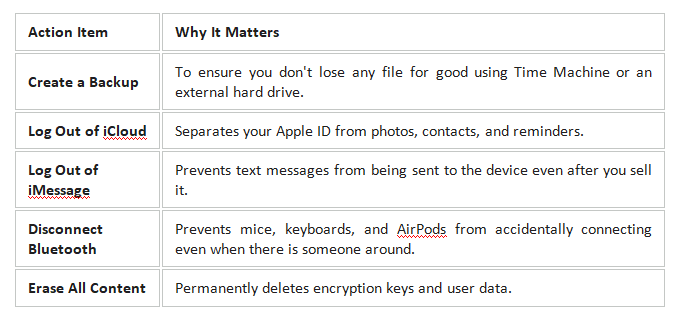
Using Erase All Content & Settings or formatting with Disk Utility Recovery ensures that your personal pictures, financial papers, and passwords will be deleted permanently and unrecoverable.