How to Unblock a Website on MacBook Air?
Whether it is a strict firewall policies in your office environment, restricted Wi-Fi connections in schools, or the Mac OS Parental Control settings, blocked website in your MacBook Air may hinder all your work. The blocking of websites in Mac operating system can occur at many different levels. It could be from operating system level to the browser level and network level routers, DNS, and firewall.
The following technical guide gives you detailed information about all the ways through which you can unblock websites in your MacBook Air.
At times, it is not the case that the website is being blocked by the administrator, but a result of an outdated DNS cache or corrupt browser state that leads you to either a blocked or error page. This will cause you to have to remove these caches so that your MacBook Air fetches an updated network path for the site.
Flushing the macOS DNS Cache
Step 1. Launch the Terminal application by using Cmd + Space and then typing Terminal and pressing
Step 2. Type or enter the following command in the Terminal app:
sudo dscacheutil -flushcache; sudo killall -HUP mDNSResponder
Step 3. Press Enter and type your Mac’s administrator password in the prompt window.
Clearing Cache in Safari and Chrome
Safari:
Go to Safari $\rightarrow$ Preferences $\rightarrow$ Advanced, and tick the box that says “Show Develop menu in menu bar”. Now you can see the Develop option on the menu bar. Click on Develop $\rightarrow$ Empty Caches.
Google Chrome:
Press Cmd + Shift + Delete. In the dropdown box, choose All time. Tick Cached images and files, and Cookies and other site data. Then press Clear data.
2. Check and Edit the macOS Hosts File
The Mac OS hosts file provides a mapping of particular domain names to particular IP addresses in the system. The administrators can add entries in the hosts file to block some particular websites such as facebook.com by directing them to 127.0.0.1.
How to Edit the Hosts File:
- Open Terminal.
- Use Nano text editor to open the file with root privileges:
- sudo nano /private/etc/hosts
- Type your Mac admin password when asked.
- Use arrow keys present on the keyboard to go through the entire file search for any line containing domain name of the website that you wish to unblock such as (127.0.01 twitter.com)
- Delete the complete line, or add a # symbol to disable that line.
- Press Ctrl + O to save all the changes. Now, press Ctrl + X to return and exit the Nano.
- Flush the DNS with Terminal Command from Step 1 to apply changes instantly.
3. Change System DNS Servers
Content filters are often put in place by network administrators at the DNS level. Whenever you try to find out the IP address of a blocked website from your MacBook Air, the request is denied by your ISP’s DNS server. You can easily bypass DNS filtering by changing your DNS to one of the trusted public resolvers.
Step-by-Step Instructions:
- Click on the Apple Menu ($\mathbf{\Apple}$) in the top-left corner, followed by selecting System Settings.
- Click on Wi-Fi in the sidebar, and then click on the Details… option beside your active network connection.
- From the left sidebar menu, choose the DNS tab.
- From the DNS Servers section, click on the + (Plus) icon in the bottom of the list.
- Add either one of the below-mentioned combinations of high-speed and unmapped public DNS servers:
- Cloudflare: 1.1.1.1 & 1.0.0.1
- Google Public DNS: 8.8.8.8 & 8.8.4.4
- Quad9: 9.9.9.9 & 149.112.112.112
6. Remove any old local DNS servers (such as 192.168.1.1) using the –
4. Use Apple’s Native iCloud Private Relay
Should you be a user of iCloud+, the MacBook Air will have an in-built feature that is known as iCloud Private Relay. This encrypts your traffic on Safari and passes it through two internet relay points, which hide your IP address and circumvent any Wi-Fi content filter.
Steps to Enable iCloud Private Relay
- Open System Settings $\rightarrow$ Click on your Apple ID name at the top-left corner.
- Select iCloud $\rightarrow$ Click Private Relay.
- Turn On the Switch.
- Select the IP Address Location – maintain general location or use country and time zone.
- Open Safari and try to access the blocked site.
Important to note: iCloud Private Relay works only within the Safari browser. It will not work in other browsers such as Chrome and Firefox.
5. Utilize a Virtual Private Network (VPN)
However, in cases where the local Wi-Fi network implements DPI (Deep Packet Inspection) or stringent firewall policies, basic modifications to DNS may not suffice. The Virtual Private Network (VPN) establishes a secure channel between your MacBook Air computer and a remote server that encrypts all web traffic from the eyes of local network administrators, ISPs, and firewalls.
Steps to Configure and Utilize a VPN on macOS:
- Choose a reliable VPN provider such as ExpressVPN, NordVPN, ProtonVPN, or Surfshark.
- Download and install the macOS client program.
- Launch the software, log in, and tap Connect to connect automatically to the best server.
- Connect and then browse any website using the web browser.
Configuring a Native WireGuard or OpenVPN Profile
In case you are unable to install third-party applications due to some administrative restrictions:
- Launch System Settings $\rightarrow$ Network.
- Select the three-dot dropdown menu button in the lower right corner and then select Add VPN Configuration.
- Choose your protocol (L2TP over IPSec, IKEv2, and so on), input your server settings, and then click Create.
6. Adjust Screen Time and Parental Controls
In case of blocking of the web page by macOS policies (usually, a full screen message appears: “You cannot visit this website”), then macOS Screen Time settings are probably active.
How to Configure Web Content Restrictions Settings:
- Go to System Settings $\rightarrow$ Screen Time.
- Choose Content & Privacy to see if it is set to On.
- Then choose App & Website Restrictions (Web Content).
- If it is configured as Limit Adult Websites, click on Customize….
- You should check whether your required domain is in the Restricted list below. If yes, just choose it and click – (Minus) icon next to it. Otherwise, you can add it in the Allowed list above.
- In case there is an active Screen Time Passcode for your Mac, you will have to enter the four-digit code here.
7. Alternative Workarounds for Quick Access
When you require immediate access to a restricted page without any change in the system configuration or network settings, then you can use the following methods as an alternative:
Method A: Using a Web Proxy Server
A web proxy server is an intermediate browser window within your browser session:
- Go to a reliable proxy server service such as HideMyAss, FilterBypass, or ProxySite.
- Type the restricted URL in the provided search box.
- Press “Go” to view the restricted site through the proxy window.
Method B: Google Translate Trick
The Google translator tool serves as an unintended proxy server as follows:
Step 1: Visit translate.google.com
Step 2: Copy the blocked web site URL and paste it in the left text box.
Step 3: Select the desired language for translation (even English if the web page is already in English).
Step 4: Click on the hyperlink of the URL in the right text box output.
Method C: Use the IP Address Instead of the URL
Occasionally, it may be necessary to block text domain names (e.g. example.com) instead of an actual IP address.
- Enter Terminal.
- Type ping example.com and press Return to see the IP address (e.g. 93.184.216.34).
- Cut the numeric IP address and enter it into your web browser URL bar.
Method Selection Matrix
To quickly determine which fix fits your scenario, use this cheat sheet:
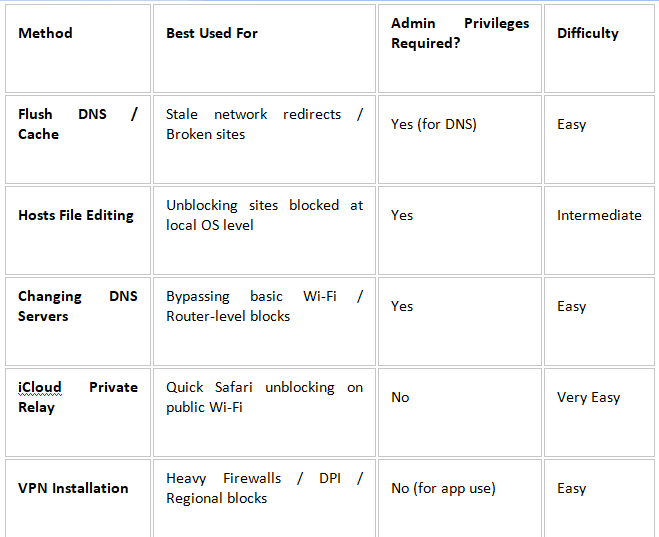
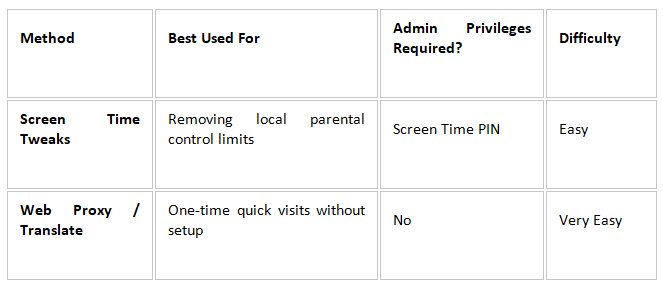
By systematically troubleshooting from local software files up through network routing options, you can bypass network filters and reliably unblock any website on your MacBook Air.