Where is Outlook for Mac OLM Files Stored on Mac?

In the following post, we have discussed the stored location of Outlook for Mac OLM files on Mac. Moreover, in the section, you will come across of solutions which will help you in converting stored OLM file database. Let us move ahead and know the process in detail.
Also Read
Outlook is a widely used Microsoft-supported email client. The application is designed for both Windows and Mac users. The Outlook for Windows stores its data in PST and OST, depending on the email account using configured with IMAP, MAPI or POP3. Whereas in Outlook for Mac, the data is not stored in a single file but stores each mailbox separately.
By default, these are the locations where Outlook for Mac stores its OLM file. It varies from version to version.
Outlook 2011 for Mac
/Users/<username>/Documents/Microsoft User Data/Office 2011 Identities/Main Identity
Outlook 2016 for Mac
/Users/<username>/Library/Group/Containers/UBF8T346G9.Office/Outlook/Outlook 15 Profiles/Main Profile
Outlook 2019 for Mac
Users/‹username›/Library/Group Containers/UBF8T346G9.Office/Outlook/Outlook 15 Profiles/Main Profile
What if the folder is hidden and I unable to find the exact location of OLM files?
Outlook 15 Profiles is hidden by default in Outlook for Mac. One can unhide Library folder to access Outlook 15 profiles folder. Follow the steps:
- Launch Finder and navigate to Home.
- Click View and choose Show View Options.
- Select Show Library folder if it is not selected and close View Options.
Once you have implemented these steps, access Outlook 15 Profiles folder. Consequently, one can access mailbox data.
How to Get Accessibility of OLM Files on Mac?
Follow the steps and create OLM file manually on Mac OS:
- Navigate to Tools and press Export.
- In Export to Archive File (.olm) window that opens, choose desired items to export and hit Continue.
- Now, Save Archive File (.olm) window appears, choose desired folder in which one wants to save OLM file. Once done, press Save.
After OLM file is created, it can be opened it using Outlook’s Import Wizard.
For Outlook for Mac 2019 and 2016 Version
- Run Outlook for Mac, go to Tools and hit Import.
- Now Import Window opens, select Outlook Data File (.olm) and click Continue.
- Provide location of Outlook for Mac OLM file and press Import.
For Outlook for Mac 2011 Version
- Run Outlook for Mac 2011, go to Files and click Import.
- Now Import Window appears, choose Outlook Data File (.pst or .olm) and hit right arrow appearing towards right bottom.
- Choose Outlook for Mac Data File (.olm) and hit right arrow one more time.
- Move to OLM file location and choose the file.
How to Make OLM File Compatible with other OS?
Use OLM Converter for Mac to batch convert OLM emails, contacts, calendar and other items into desired file format. The utility enable users to perform OLM conversion into PST, PDF, MSG, EML, MBOX, Thunderbird, CSV, vCard/VCF, ICS, Office 365 and more. The application does not require the installation of Outlook for Mac email client.

The software equipped with many advance features and powerful options which will help to perform the process according to need. Download free trial edition now and test the working procedure.
Steps to Transform OLM File into Accessible Format
Step 1. Download the Mac OLM Extractor on Mac platform.
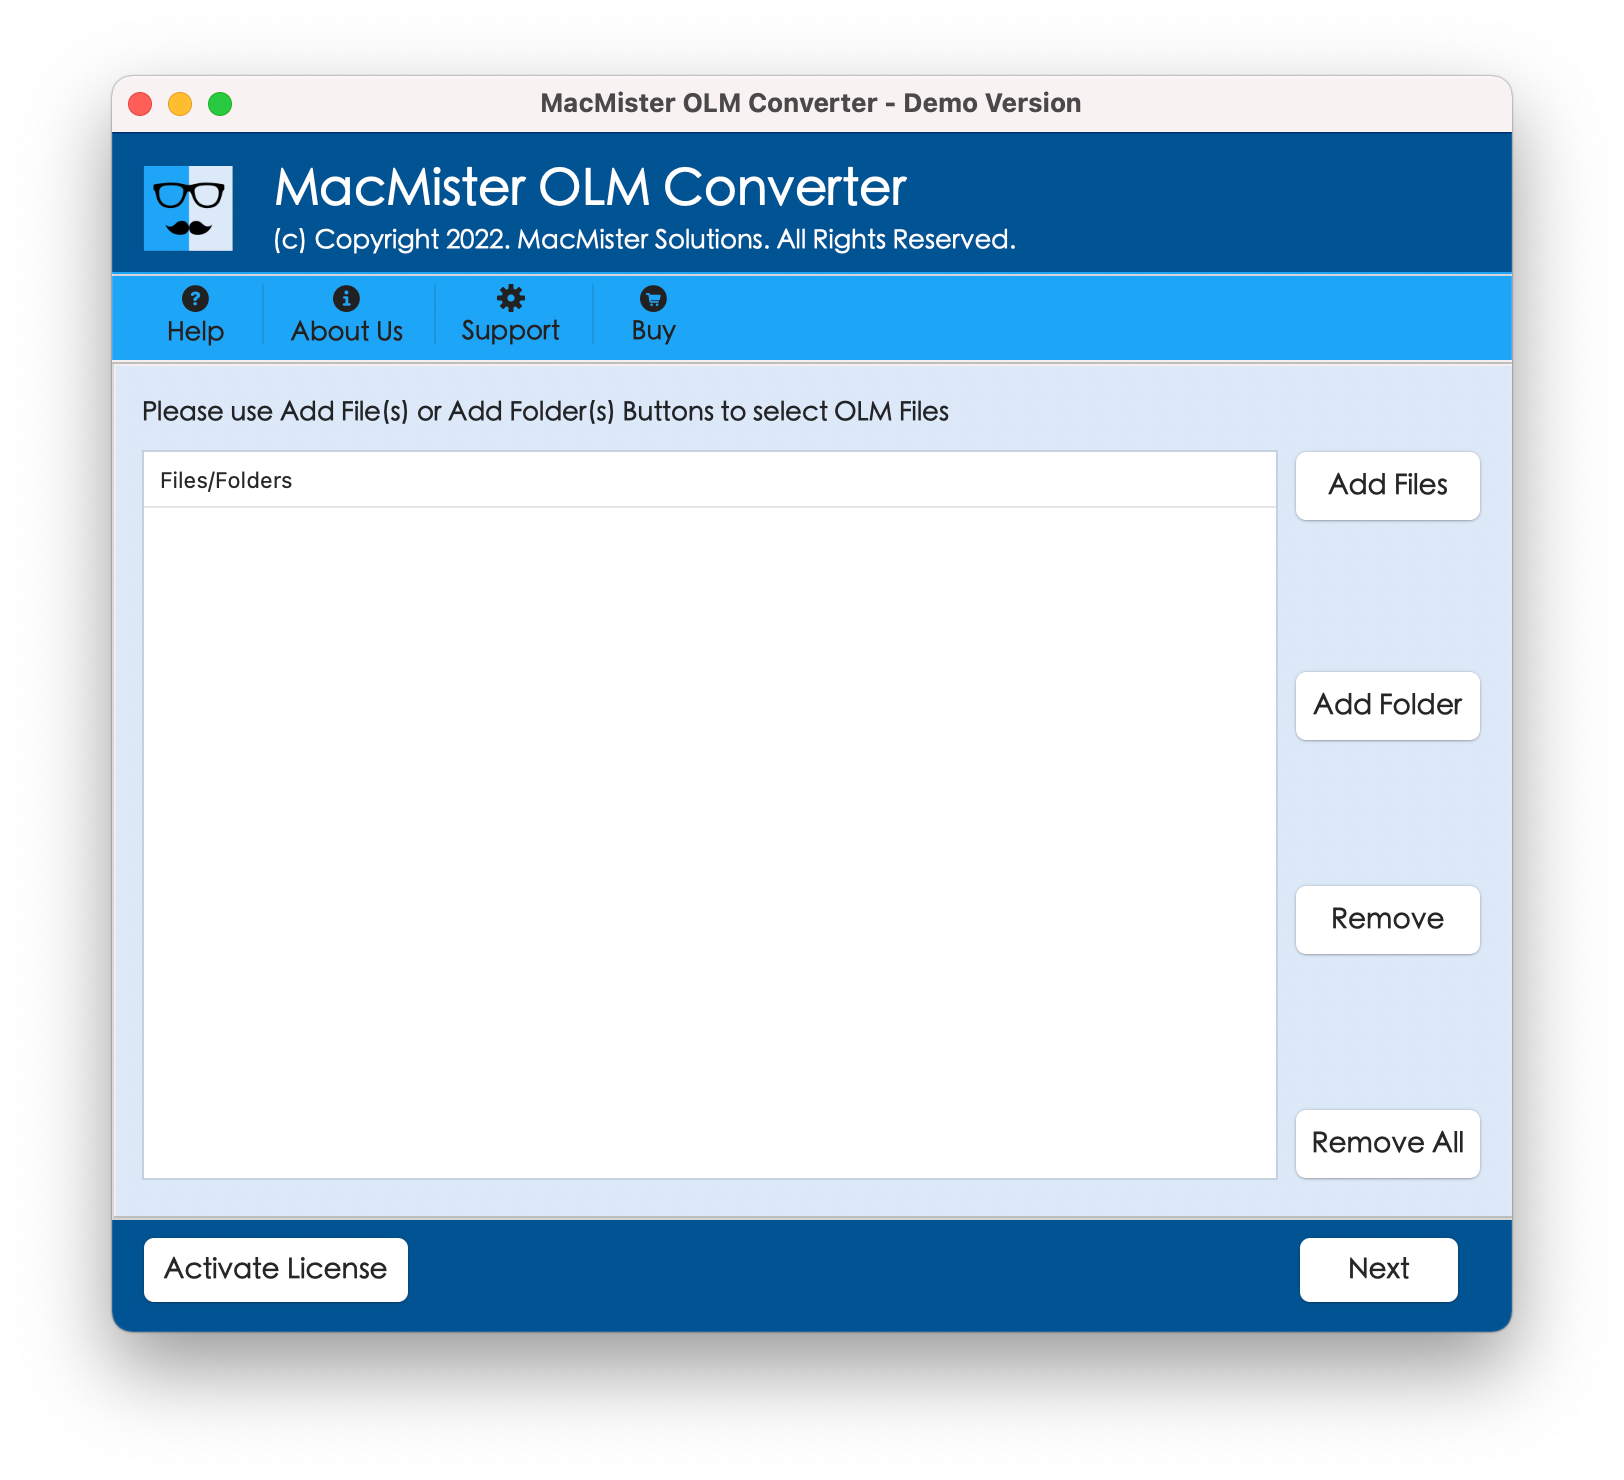
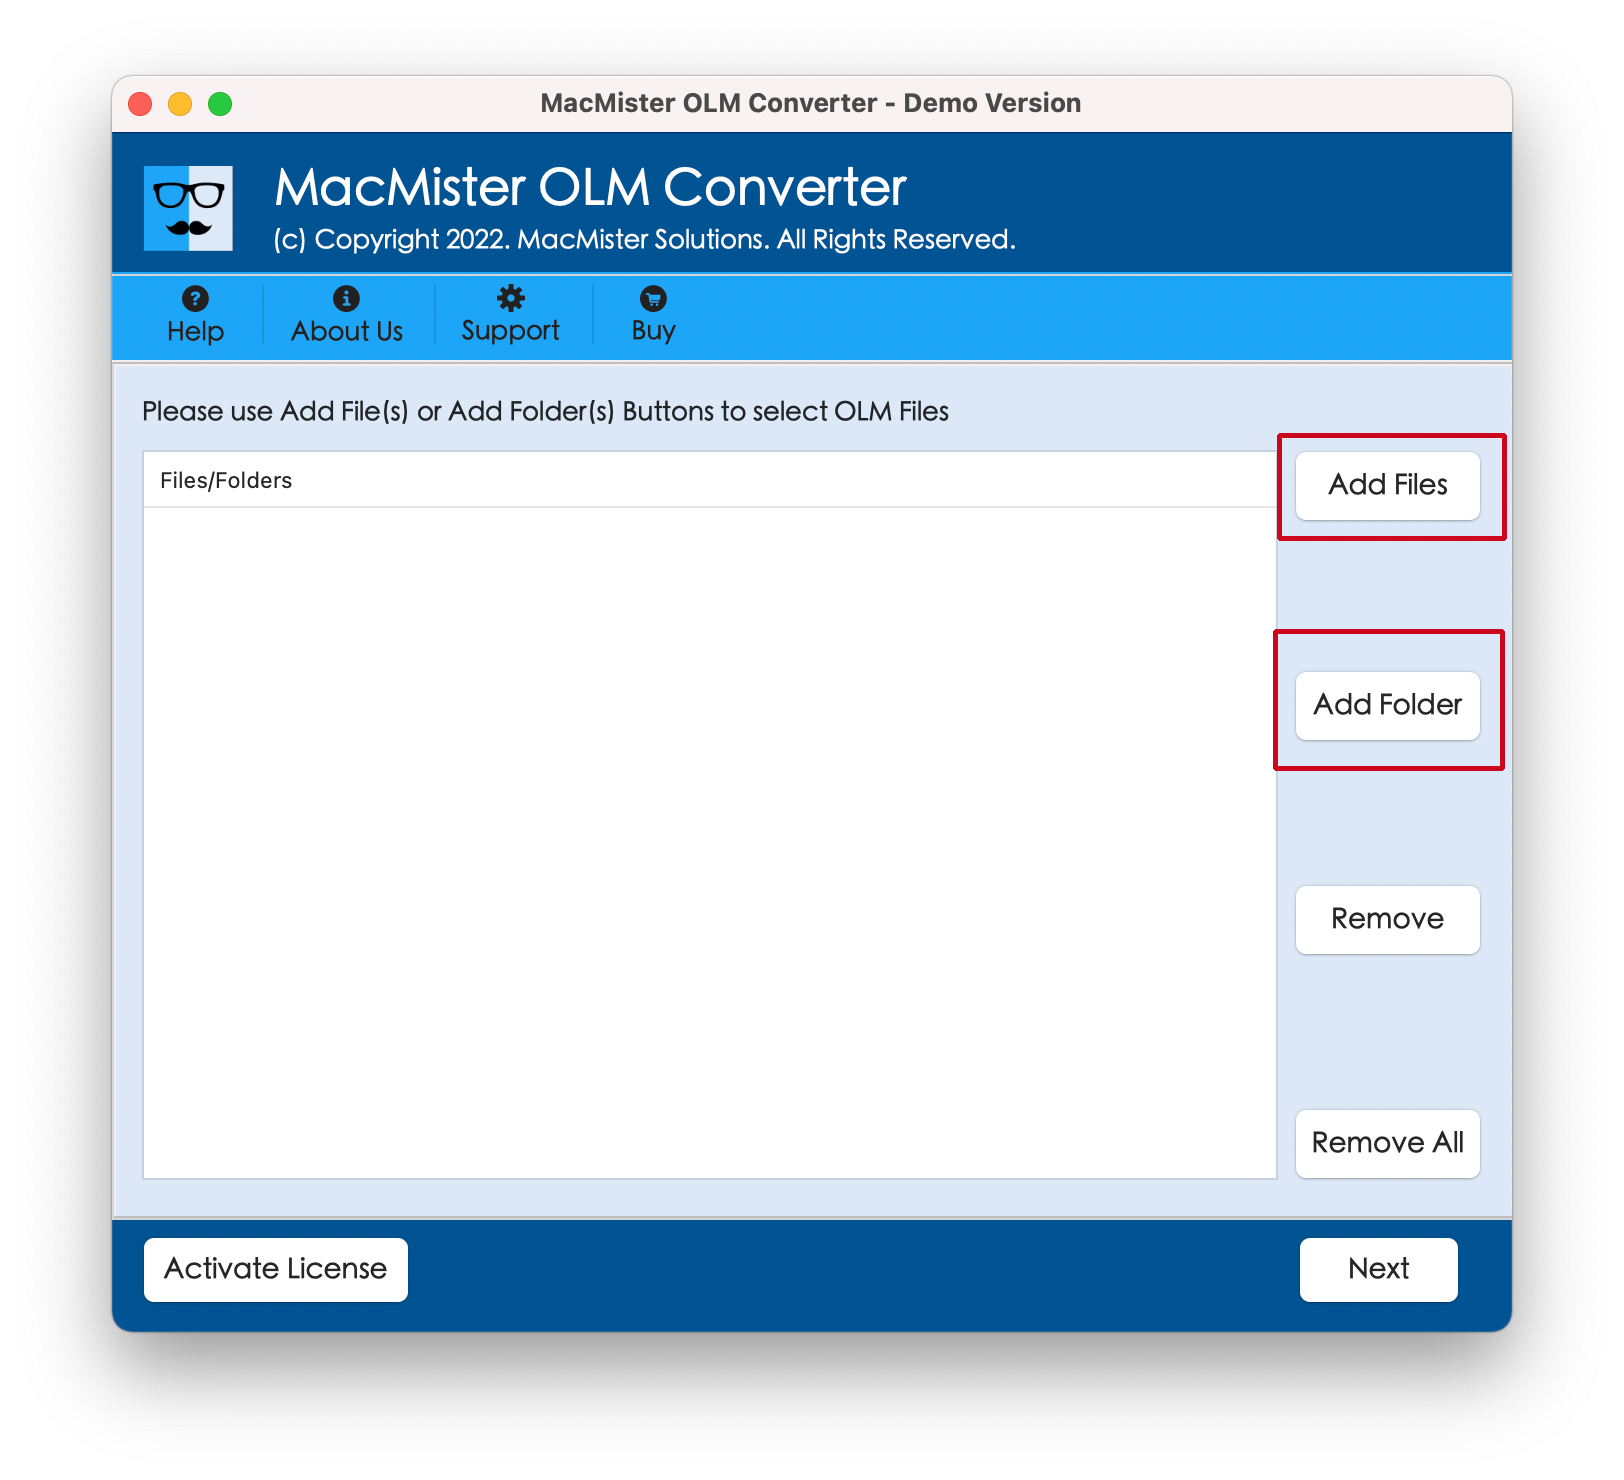
Step 2. Add OLM files on a software using Add Files and Add Folder button and click Next.
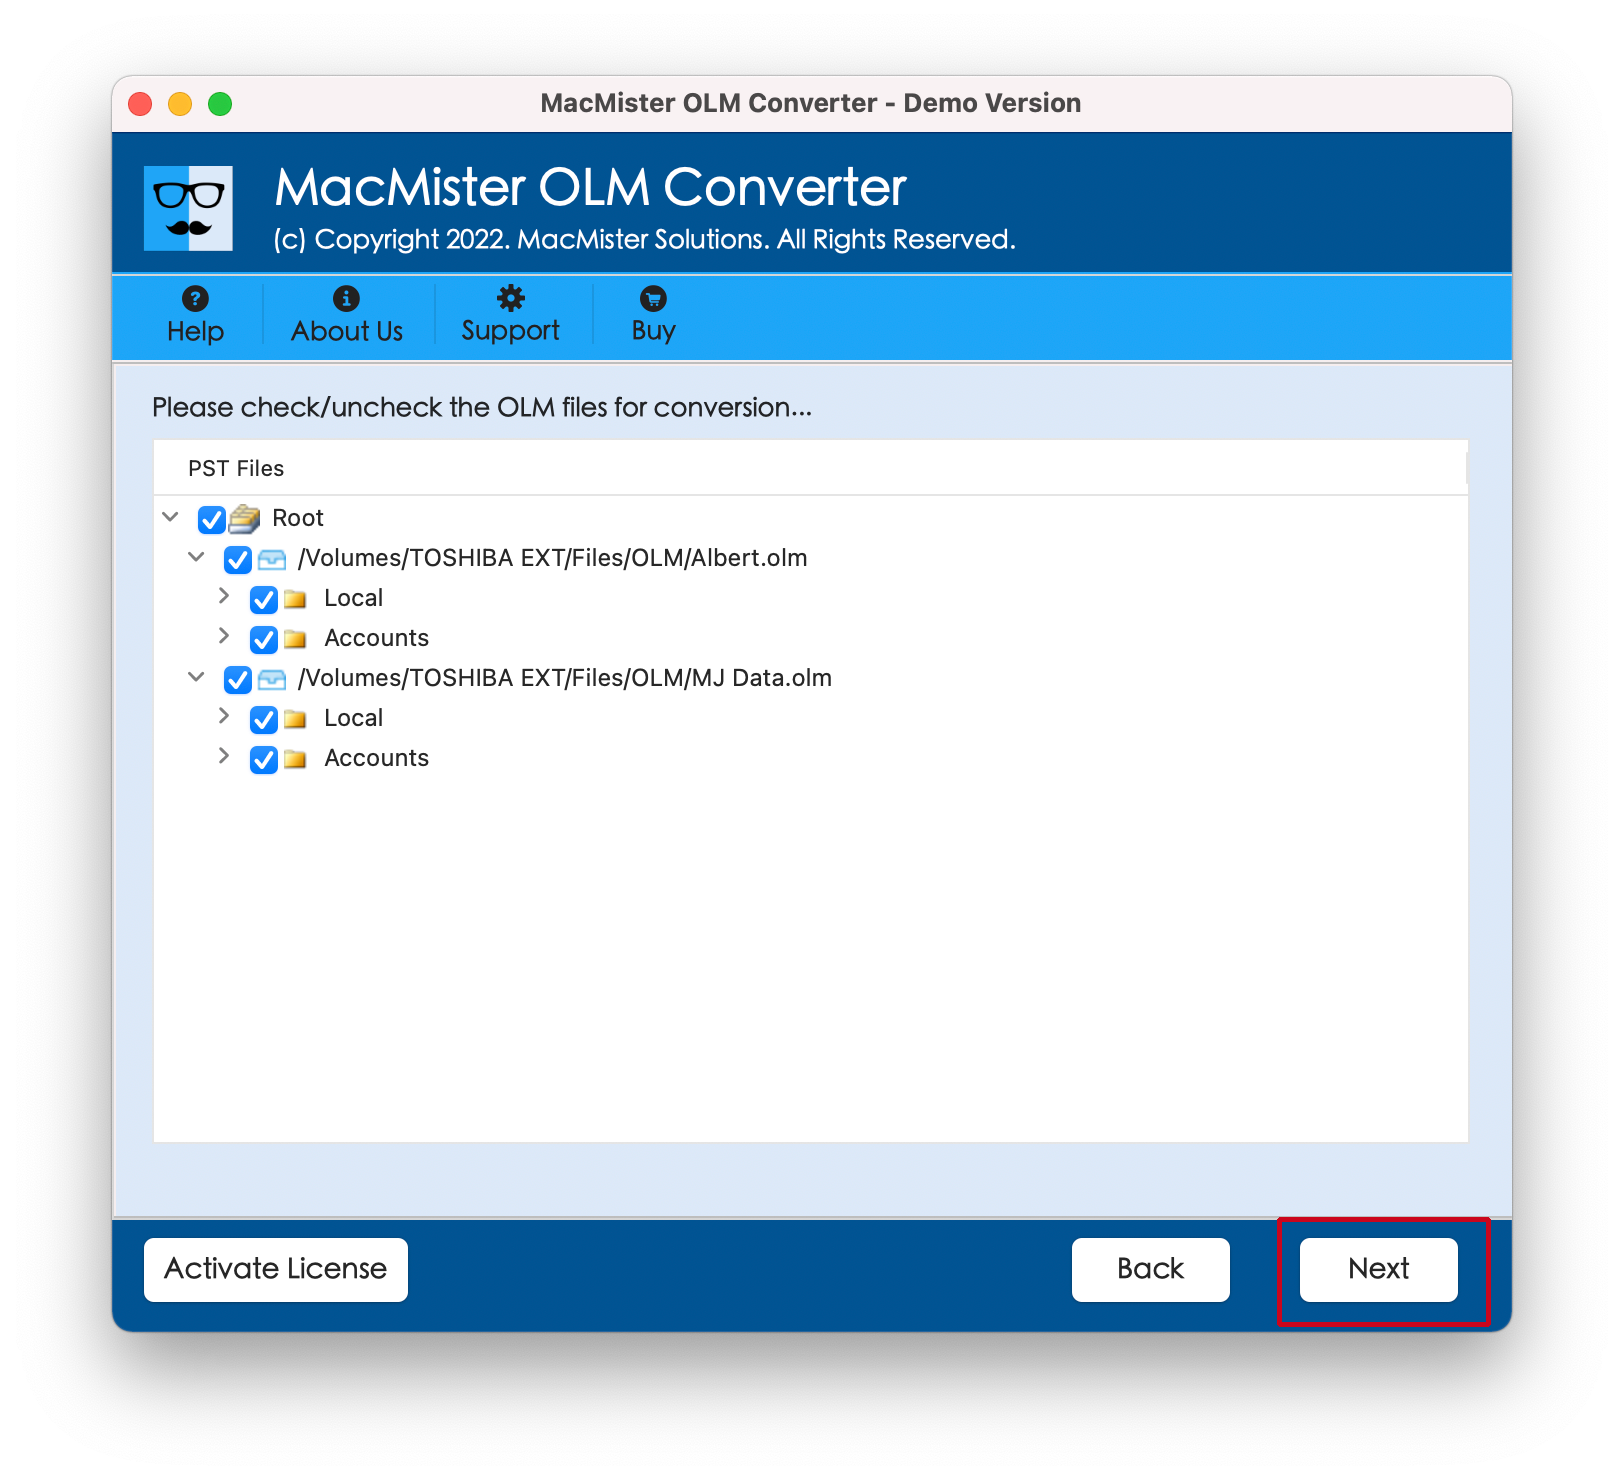
Step 3. The OLM file items will be listed in hierarchical structure with checkboxes. The checkboxes will be used to transfer selective OLM files. Click Next.
Step 4. Choose the saving option from Select Saving Option drop-down list.
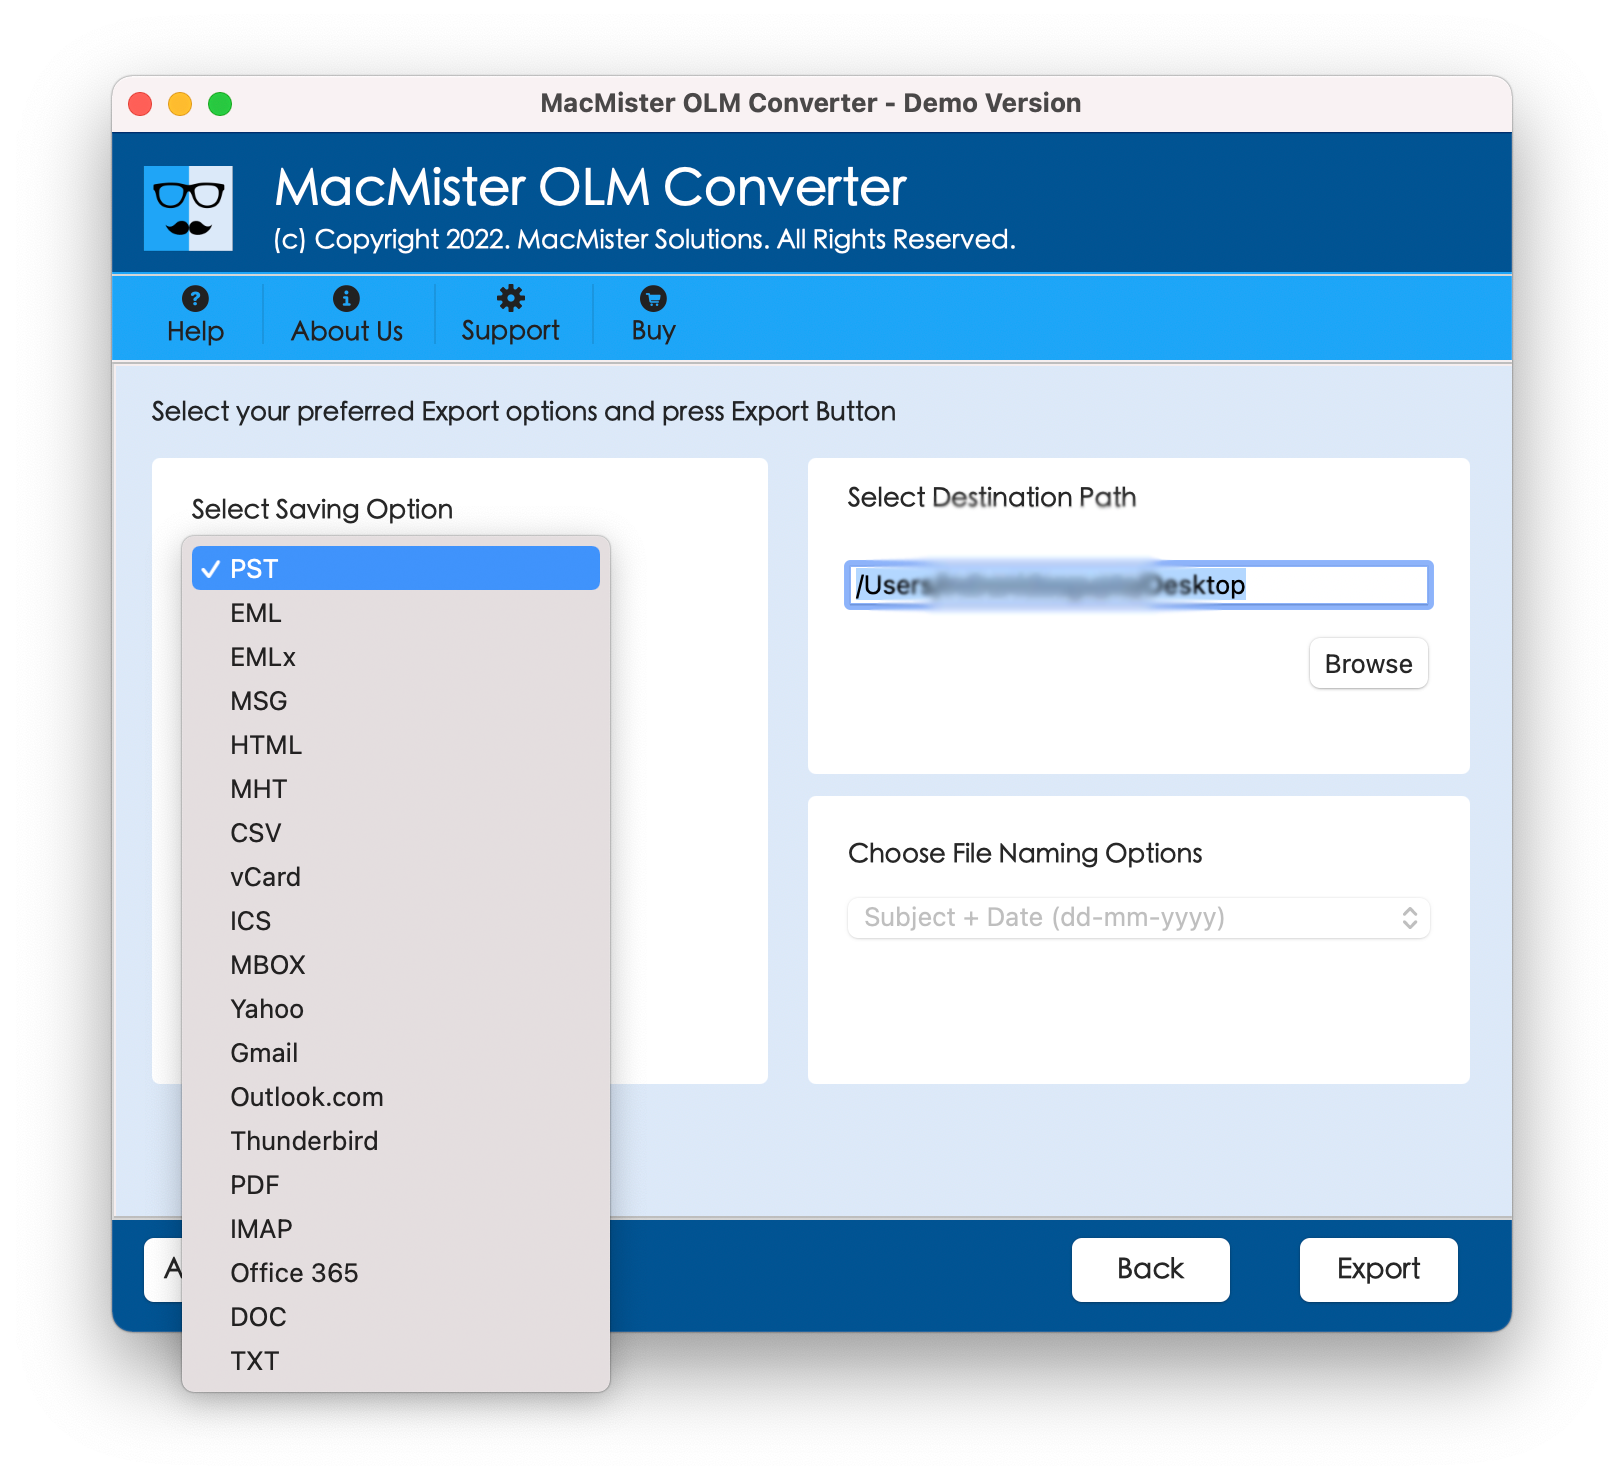
Step 5. Apply sub-options of a chosen format and click Export.

Step 6. Procedure will ultimately start and shows Live Conversion report on the screen.
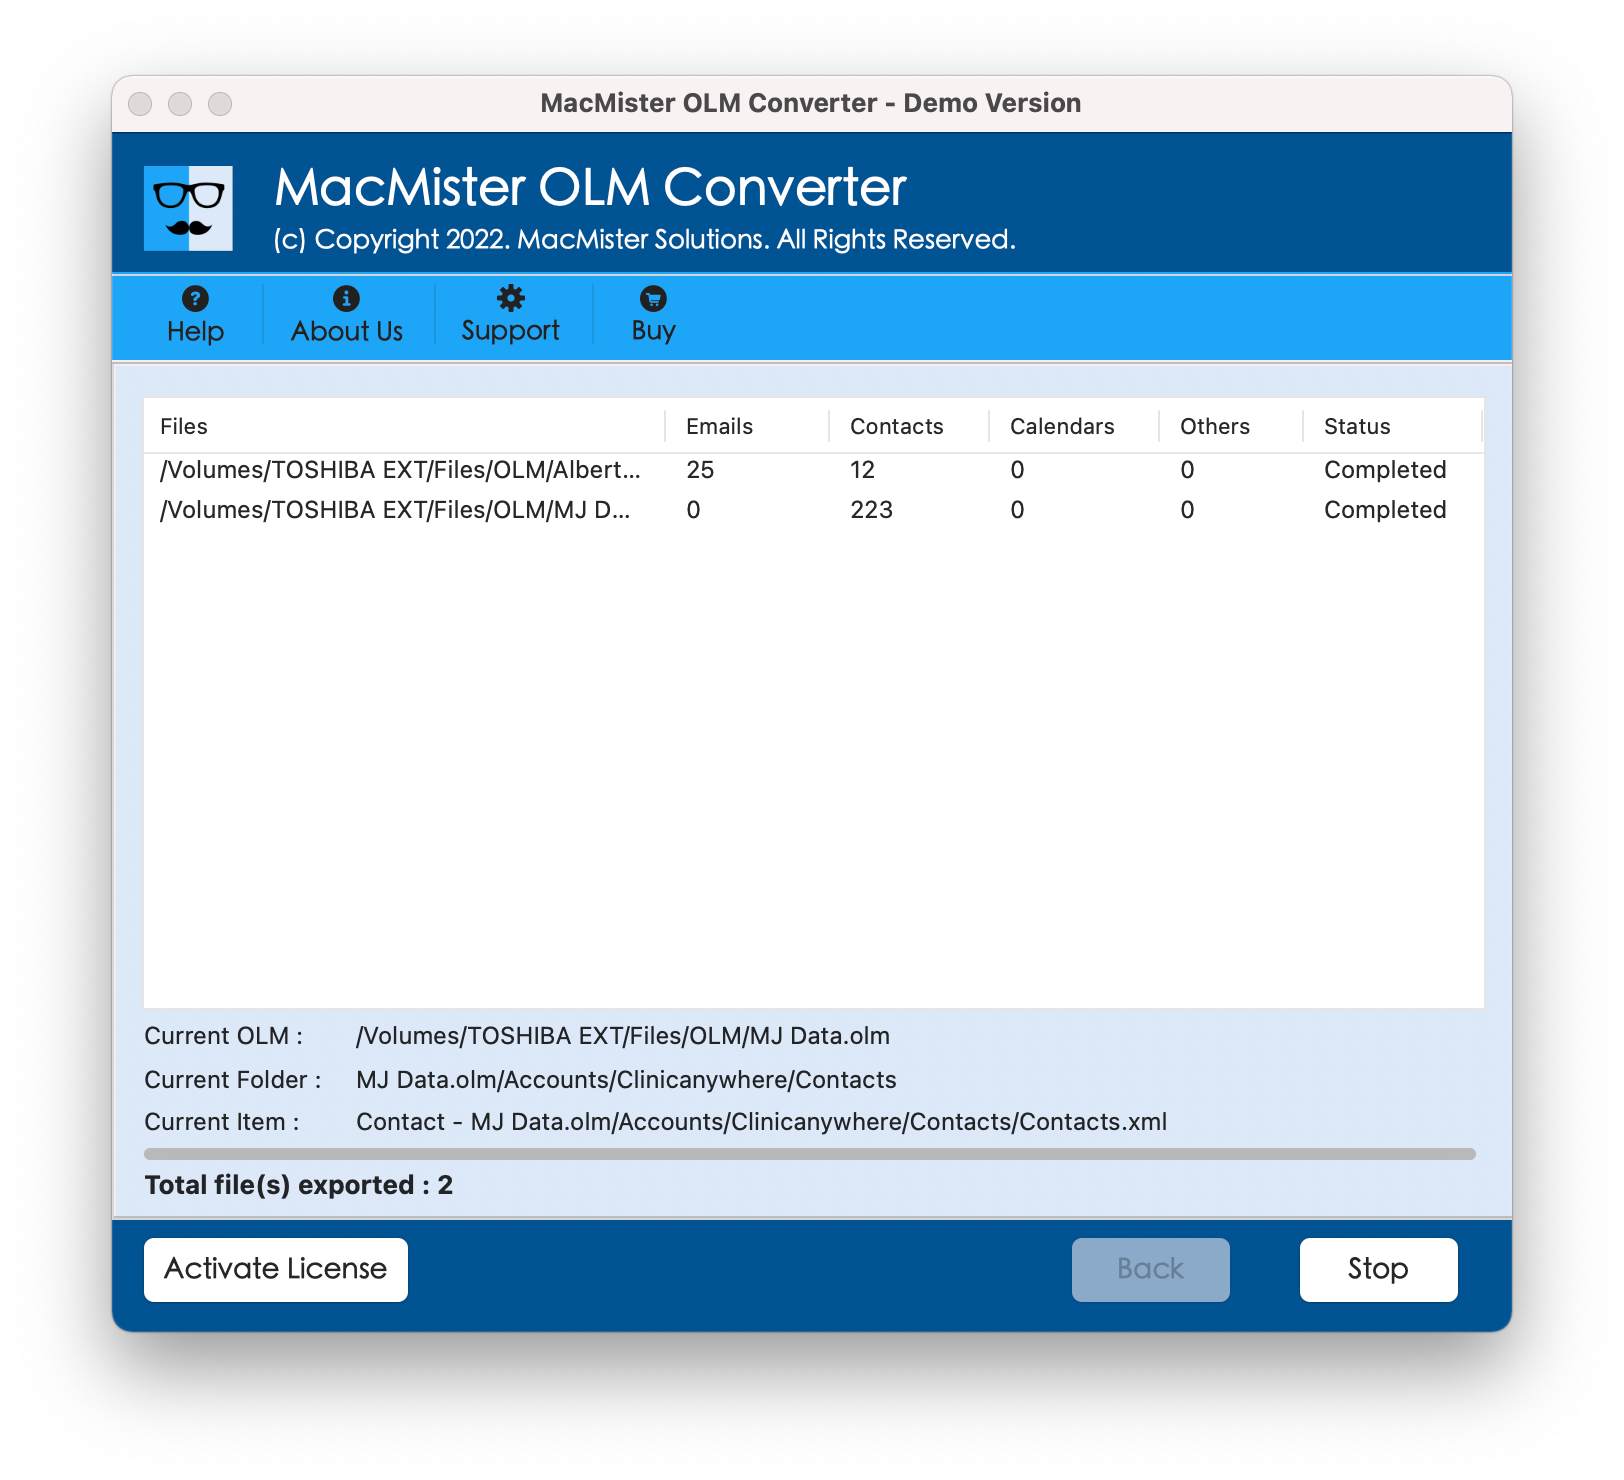
Once the process successfully ends, the message will appear on the screen “Conversion Completed”. Click OK and confirm the conversion. Now, go to the resultant file saving location to check the transferred file database.
Note. The demo edition allows to convert first 25 OLM files from each Outlook for Mac item free of cost. The freeware version will help to experience the processing and features of the application. You can contact our support team anytime if you find any issue while performing the process.
Conclusion
The entire article offered a guidance to locate OLM file on Outlook for Mac. By taking help of the post, users also able to understand how to access OLM data without Outlook for Mac on multiple platforms as well.