How to Securely Wipe Personal Data from Your Mac before Trade-In?
Upgrading your Mac through trade-in is a great way to defray the expense of an upgrade. But turning in your used device without wiping out your personal data opens you up to grave privacy and security concerns. Your Mac is much more than photos and documents; it keeps account credentials in cache, browser histories, encrypted information, and financial information.
Deleting files and emptying your trash bin does not really wipe away your information; it merely makes the memory available for reuse. Complete data erasure requires that you take more drastic steps. This step-by-step guide shows you how to do just that by backing up, signing out, and wiping your Mac clean before trading it in.
Phase 1: Essential Pre-Erase Steps
Prior to executing any wiping utilities and resetting your OS, here are some initial steps you should undertake to safeguard yourself from losing any critical information and make device activation easy for the next user.
Backup Your Files
It’s always best to have a duplicate backup of your files. This can be done via Time Machine using an external disk or transferring your essential files to cloud services such as iCloud Drive, Google Drive, and OneDrive.
Sign out from Apple ID and Services
For detaching your device from your personal Apple account and freeing up its Activation Lock:
iCloud – Launch your System Settings (System Preferences) app and select your Apple ID, then click on the option “Sign Out.”
iMessages – Launch the Messages application and go to Settings > iMessages and sign out.
Find My Mac – It’s vital that Find My Mac is switched off under iCloud settings for your smooth board reset.
Unpair Bluetooth Devices (Optional)
If you are keeping your wireless keyboard, trackpad, or headphones, go to System Settings > Bluetooth and unpair them to avoid accidental connections if the devices remain nearby.
Phase 2: Managing Storage with MacMister’s Advanced Wiping Utility
In case you wish to retain your wireless keyboard, mouse, or headphones, access System Settings > Bluetooth and unpair them to ensure no unexpected connection should they stay within your vicinity.
Although the standard built-in reset utilities format your hard drive properly, advanced file recovery tools may sometimes retrieve the remnants of data left on the magnetic and solid-state drives. To assure full privacy and security in relation to data destruction, one can utilize the specialized software, for instance, MacMister Data Erasure Tool for Mac.
MacMister Data Wipe Software for Mac offers high-end file and hard drive destruction for macOS. It bypasses the standard sector of disks applying certified international wiping protocols, thus ensuring the total irreversibility of sensitive business or personal files.
Key Features of Remarkable Application:
Over 15 Global Wiping Policies: Ensures adherence to standard data wiping practices such as Zero (1 pass), Random (1 pass), US DoD/US Air Force (3 passes), NATO Standard (7 passes), and Peter Gutmann (35 passes).
Specific File and Folder Deletion: Provides options of loading (Add File(s) and Add Folder) in order to erase specific private folders, user profiles, and cache browsers before performing a full disk wiping.
Detailed Data Filtering: Facilitates filtering of data based on date or specific file masks (extension). This makes it possible to erase specific sensitive files.
Tamper Proof Audit Report: Automatically provides an erasure report upon completion of the wiping process in order to ensure compliance during audits.
MacOS Compatibility: Ensures compatibility with different versions of the macOS operating systems including Ventura, Monterey, Big Sur, and previous macOS releases.
How to Use the Software Before Trade-In:
Step 1. Open the tool on your computer.
Step 2. Add Files or Add Folders to choose directories where confidential information resides or wipe secondary partitions and removable devices.
Step 3. Inspect files and folders that appear on the preview window.
Step 4. Choose Wiping Standard you prefer (e.g., US DoD 5220.22-M 3 Passes, Zero 1 Pass) from the pull-down list.
Step 5. Tap Wipe to start permanent erasure.
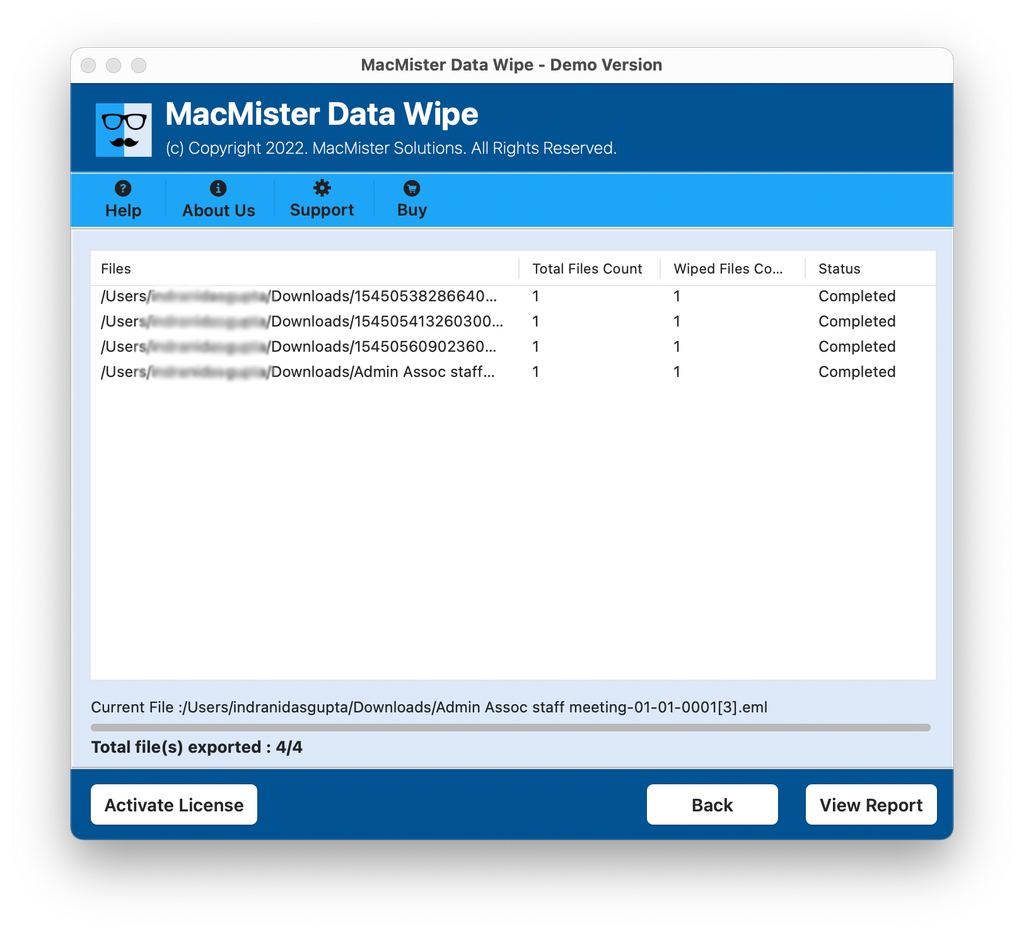
Phase 3: Factory Resetting macOS
After securely shredding high-risk folders and personal files using the MacMister tool, perform a final OS-level factory reset to return the Mac to its original out-of-box state.
For macOS Monterey (12.0) or Later (Apple Silicon & T2 Macs)
Modern Macs feature a streamlined reset utility similar to iOS:
- Open System Settings (or System Preferences) from the Apple menu.
- Click General in the sidebar, then select Transfer or Reset.
- Click Erase All Content and Settings.
- Enter your admin password when prompted by Erase Assistant.
- Review the summary of items to be removed, enter your Apple Account password to log out, and confirm by clicking Erase All Content & Settings.
For Older macOS Versions or Legacy Intel Macs
In case your Mac doesn’t have the Erase Assistant functionality, do the following steps:
- Turn off your Mac. Press the Command (⌘) + R key combination until the Apple logo pops up.
- Go to the Recovery Utilities window and choose Disk Utility.
- Choose your main hard drive (Macintosh HD in most cases), click
- Erase at the top of the window and format the volume as APFS (or Mac OS Extended Journaled).
- Then go back to the previous window and choose Reinstall macOS.
Phase 4: Final Trade-In Checklist
Before packing your Mac into a shipping box or taking it to an Apple Store or third-party refurbisher:
Step 1. After the factory reset process has been completed and the computer boots back into the initial setup screen (various languages saying “Hello”), press and hold the power button to shut it down. Do not set up your account at all.
Step 2. Clean the screen, keyboard, and chassis with a lint-free microfiber cloth wet with water or 70% isopropyl alcohol.
Step 3. Collect any original power cords/charging accessories needed for getting the full estimated trade-in value.
Epilogue
Preparation of the Mac to be sold is not just a matter of logging out of iCloud and emptying the Trash. By performing both a service sign-out and data wipe via MacMister Data Removel Tool, you will ensure that any personal data or cache stored in the computer is irretrievably destroyed. Ending the whole process with a fresh factory reset of macOS completes the preparation.