Is your MacBook pro taking a lot of time to boot as usual? Is it continuously crashing when you are trying to open multiple applications at once? Does your system frequently running out of storage? If yes, then all you need is to clean MacBook Pro hard drive by removing all the unnecessary files and apps that are clogging up your machine.
Keeping your MacBook Pro in a good working state can give you several benefits. Just follow the guide to clean up and optimize your MacBook Pro, which will help in improving its speed and making it more responsive.
Before we start:
Want to free up storage on your Mac? MacMister Data Wipe for Mac will help in clearing hidden junk files from the Mac system, creating more storage space for new data. It seeks out files which are unnecessarily stored and safely removing it without affecting the stability of your MacBook Pro.
Here’s how you can take benefit of the app to clean MacBook Pro hard drive:
- Download the app on your MacBook Pro.
- Use Add File(s)/Add Folder options to add unnecessary files on the tool.
- Verify them and click Next.
- Choose wiping method as per your need. Simultaneously apply Filters if you want and tap Wipe button.
- Wiping process starts and finishes within seconds.

Do MacBook requires clean up timely?
Cleaning MacBook regularly is an essential part of system maintenance. The build-up of unnecessary data consumes storage space which slows down the system, making it unstable. If somehow Mac has no storage space left, it will be affected by the following issues:
- Sudden crash of Mac applications.
- Browsers failed to open webpages.
- Features like Spotlight not working.
- Difficulty in locating necessary file.
- Mac processing become slow and unstable.
Does Mac contains its own clean-up tool?
Mac does not contain any clean-up tool, one need to manually clear all the unnecessary files and uninstall applications. But still if you need any help in locating junk files that are hidden or if your machine needs deep cleanout, then it is recommended to opt third-party tool.
Clear MacBook Pro Hard Drive Manually
There are proper cleaning apps available which will easily fix the issue. Even some manual optimization tools are present which can be taken advantage of on Mac OS to reduce data usage. The important ways to do perform the same are:
- Clearing MacBook Pro storage.
- Cleaning Mac by utilizing Finder.
- Make use of System Preferences to clean MacBook.
- Use Activity Monitor to stop rogue processes.
- Clearing RAM using Terminal.
Method 1. Clear MacBook Pro Storage
At first, open Mac Storage Tool using the steps mentioned below:
Step 1: Open System Settings app on the Mac.
Step 2: From the sidebar, click General and select Storage.
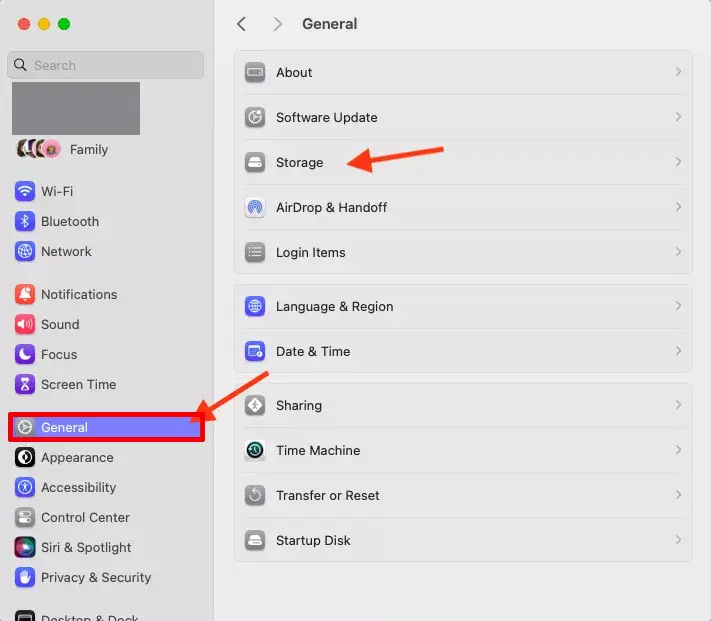
Now, here you will be able to see the total storage space that MacBook Pro has used and the total storage space which is left to store new files and folders. After reviewing the same, follow the tips below and start optimizing the system data storage.
1.1 Uninstall unnecessary applications
Step 1: From the storage menu, click on i icon appearing next to Applications.
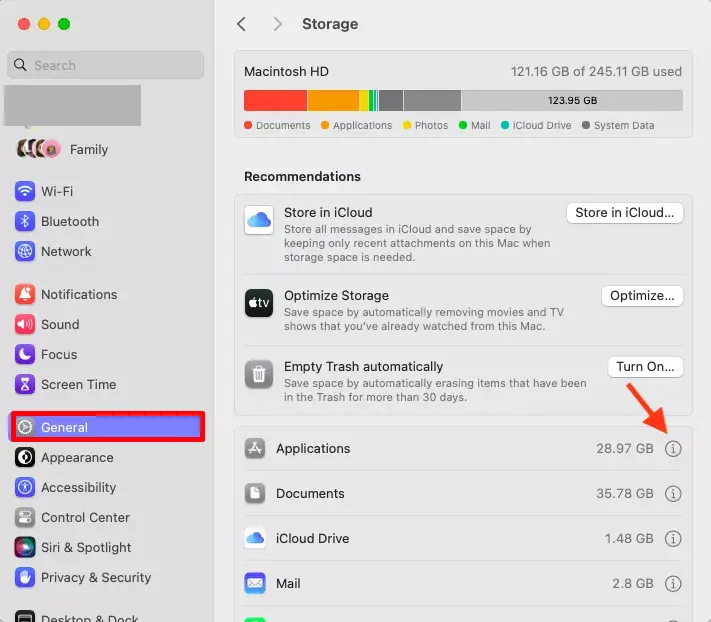
Step 2: Choose the applications you do not need and then tap Delete button.
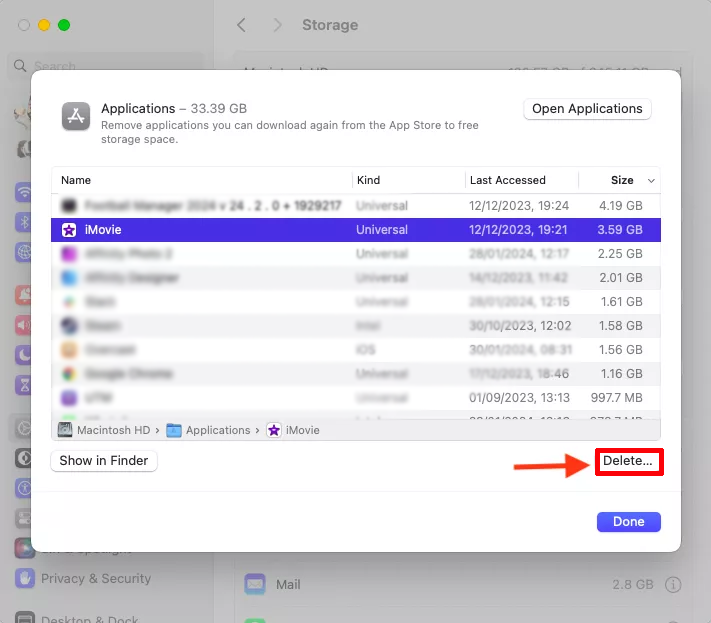
Step 3: Again press Delete button to confirm.
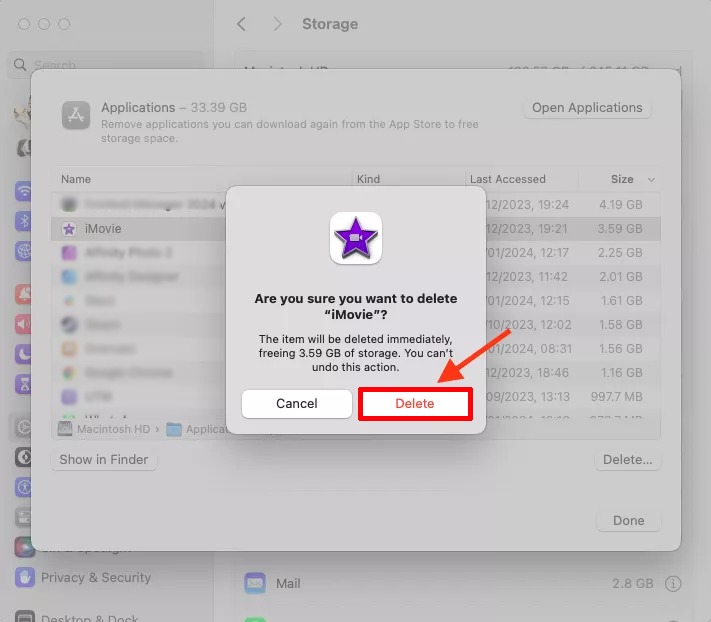
1.2 Delete the large size documents that are consuming lot of space
The Storage menu in System Settings will provide the option to erase unwanted data files. Check the steps from below:
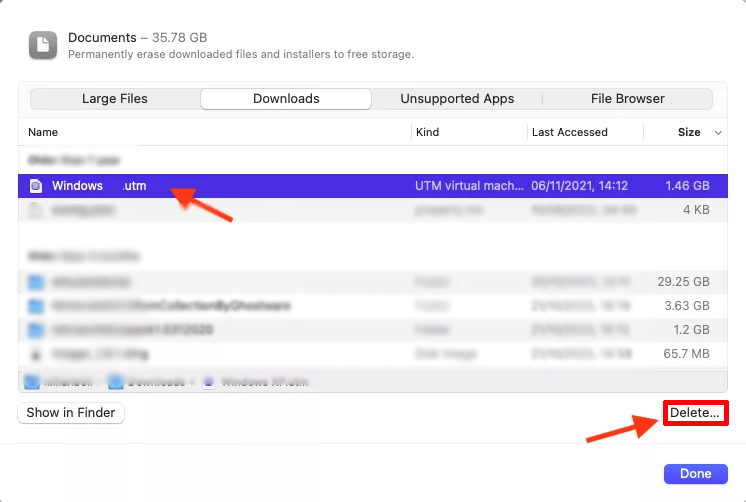
Step 1: Click i icon appearing next to Documents.
Step 2: Now, you will notice multiple tabs, choose the necessary one and search for the files you want to remove: Large Files, Unsupported Apps, Downloads, and File Browser. Select one file or multiple files you want to delete.
Step 3: Press the Delete button.
Step 4: Again click on Delete button to confirm that appears in a pop-up window.
1.3 Erase old iOS Backup
Step 1: Connect your iPhone or iPad with your MacBook and open Finder.
Step 2: Choose the device appearing in the sidebar.
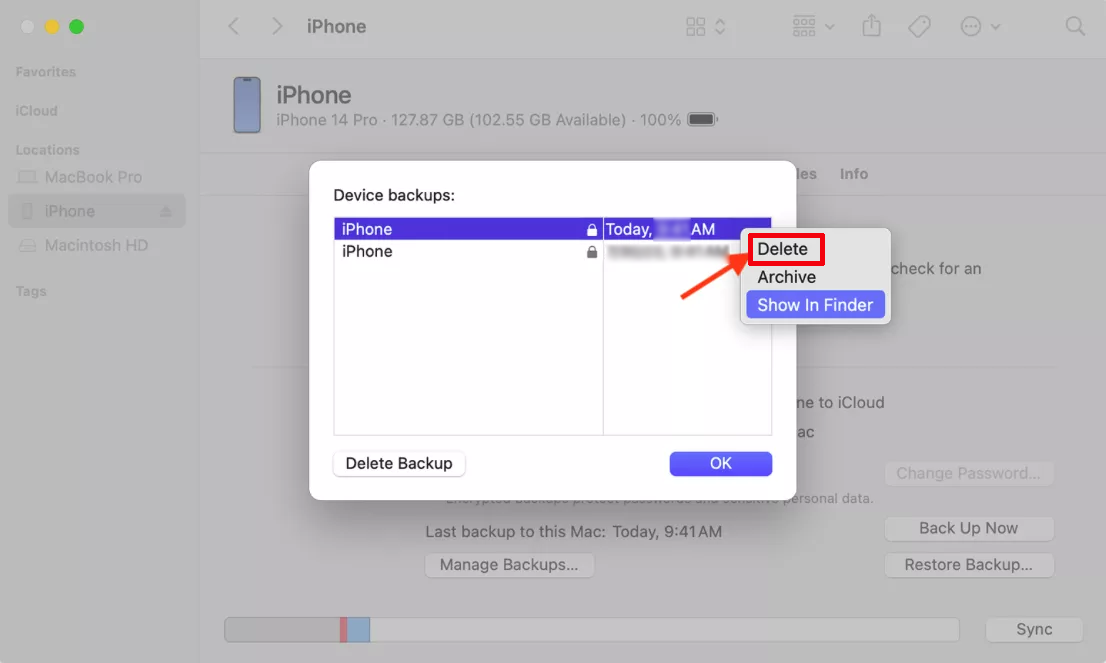
Step 3: Under General tab, select Manage Backups.
Step 4: Choose the old backup that is no longer required and right-click on it.
Step 5: Press Delete button and remove the backup from MacBook Pro.
1.4 Remove Unnecessary Messages and create more Storage Space
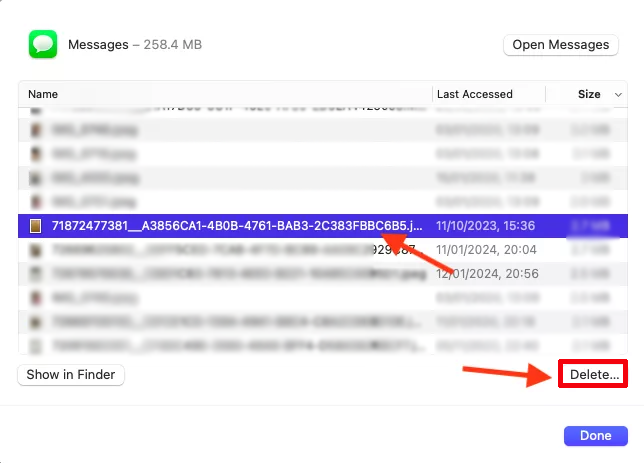
Step 1: Go to Storage Menu in System Settings and click on the i icon appearing next to Messages.
Step 2: Choose the photos and videos that is no longer required and hit Delete button.
Step 3: Again click Delete button to confirm.
1.5 Clear the Trash
After erasing the unnecessary files or folders on MacBook, go to the Trash or Bin to permanently empty them.
Step 1: Right-click on a Trash or Bin icon that appears on a Mac’s dock.
Step 2: Click Empty Trash or Empty Bin to clear all the files.
Step 3: Again click Empty Trash or Empty Bin to confirm.

Method 2. Wipe MacBook Pro using Finder
Clearing unnecessary files using Finder can be exhausting but it gives you the most control if you are aware of what you are doing.
2.1 Find Duplicate Files with Smart Folders
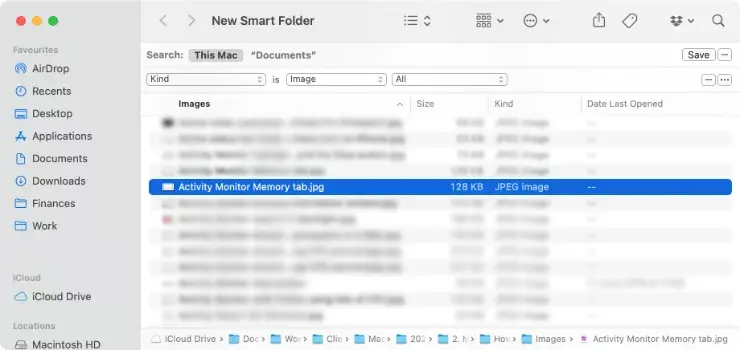
Step 1: Open Finder and navigate to File. Choose New Smart Folder.
Step 2: A window will appear. Click + button to add a search filter.
Step 3: Make use of a second dropdown menu to find specific type of file such as Application, Image, or Document.
Step 4: After selecting a file type, Finder will show all the similar files on the screen.
Step 5: Navigate to View and select As List and click on the first column header to maintain these files alphabetically.
Step 6: Scroll until you find all the duplicates. You may remove them, just right-click on the same and choose Move to Trash option. After this go to the Trash folder and empty the files stored in the same permanently.
2.2 Clear the Caches on Mac
After browsing the web, Mac will store all the images and files in caches to make the loading process faster if you are revisiting the same pages again. This will take a lot of space over time and thus it is important to clean them regularly:
Step 1: Open Finder
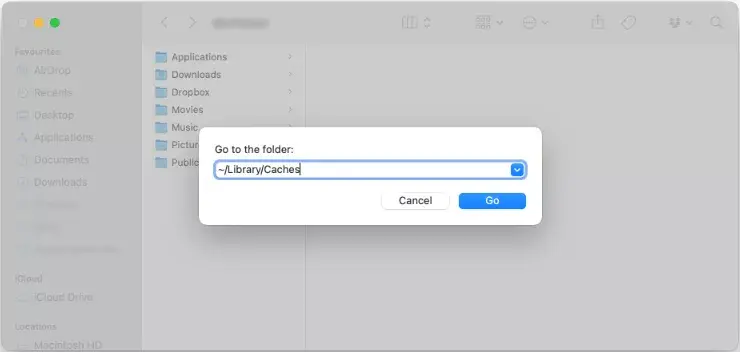
Step 2: Click Go and select Go to Folder option.
Step 3: Enter ~/Library/Caches and press Go button.
Step 4: Find the unnecessary cache files and delete them by right-clicking on it and choosing Move to Trash option.
2.3 Organize your desktop
Step 1: Right-click anywhere on the desktop.
Step 2: Select Use Stacks to maintain all the files into stacks categorized by a file type.
Method 3. Use System Preferences to Clear MacBook Pro
3.1 Delete Local Time Machine Snapshots
There are many Mac users who use Time Machine for data backup. Thus snapshots get stored on the machine at different points in time so that you can restore the data whenever needed. Removing the snapshots which no longer needed will generate more storage space.
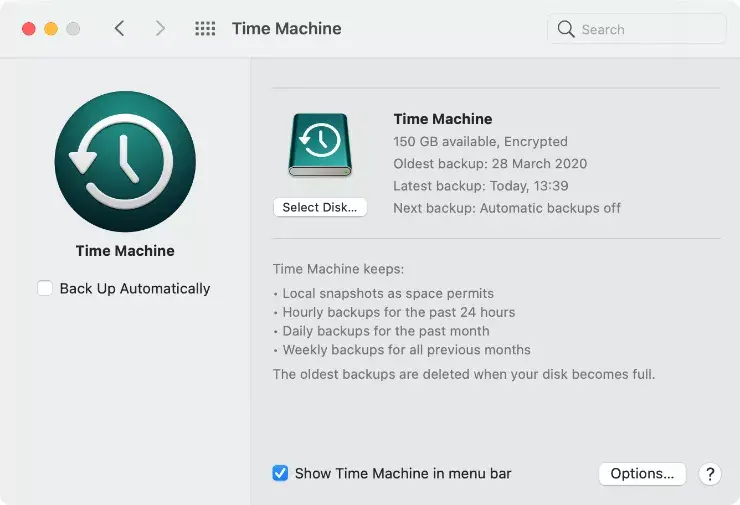
Step 1: Open System Settings app, go to General and then Time Machine.
Step 2: Un-tick Backup Automatically option to disable the feature.
Step 3: Wait for few minutes until macOS deletes all the snapshots and then enable automatic backup again if you still want to use it.
3.2 Erase all the old user accounts stored on Mac
There are many Mac users who use Time Machine for data backup. Thus snapshots get stored on the machine at different points in time so that you can restore the data whenever needed. Removing the snapshots which no longer needed will generate more storage space.
Step 1: Open System Settings and go to Users & Groups.
Step 2: Select i icon button appearing next to old user account you wish to remove.
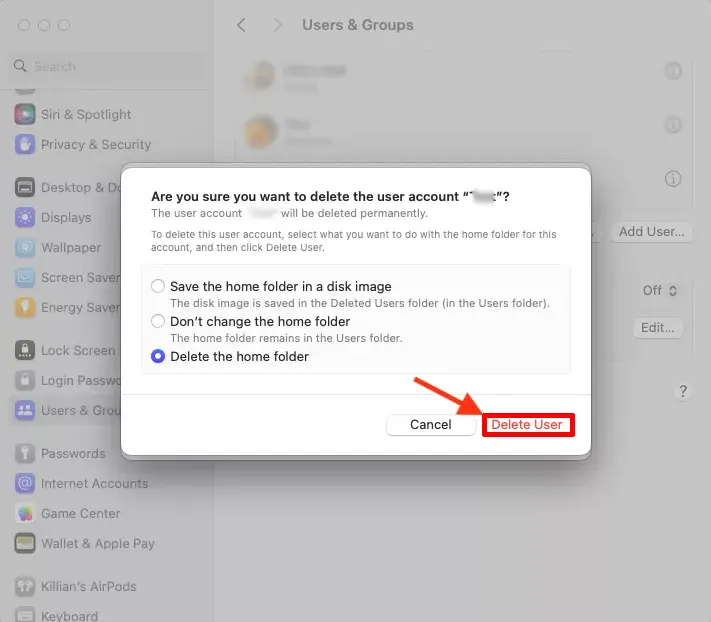
Step 3: Tap Delete User.
Step 4: If the user account contains its home folder, then you will see multiple options to handle its data. You can either save the home folder as a disk image or leave it as it is or if you want you can remove it. However, we recommend to select Delete the home folder to create more space but only if the data saved to the account is no longer required because later you won’t be able to recover it.
Step 4: Again click Delete User button to confirm.
3.3 Clear Login items
Login items are the apps and background processes that launch every time you login to Mac. They consume a lot of processing power.
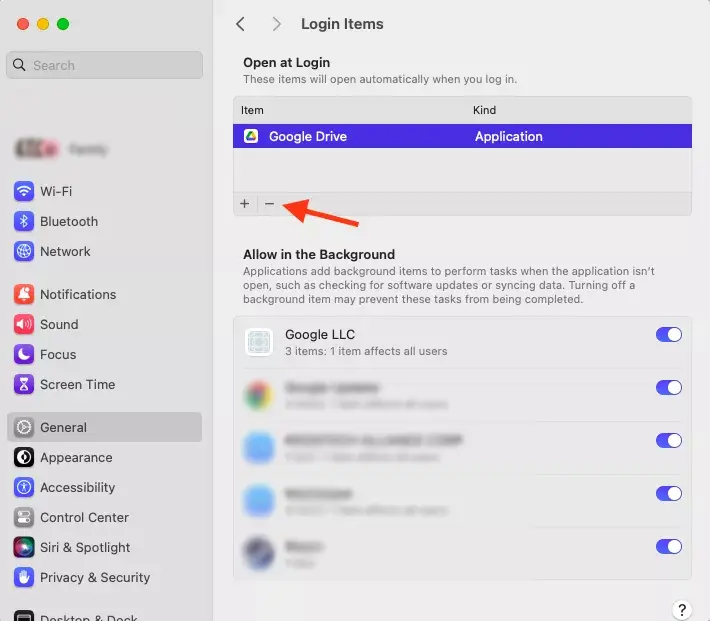
Step 1: Open System Settings app, click General and select Login Items.
Step 2: Open at Login section will appear, choose the app you do not want to run automatically during start up and then click (- minus) button to disable the same.
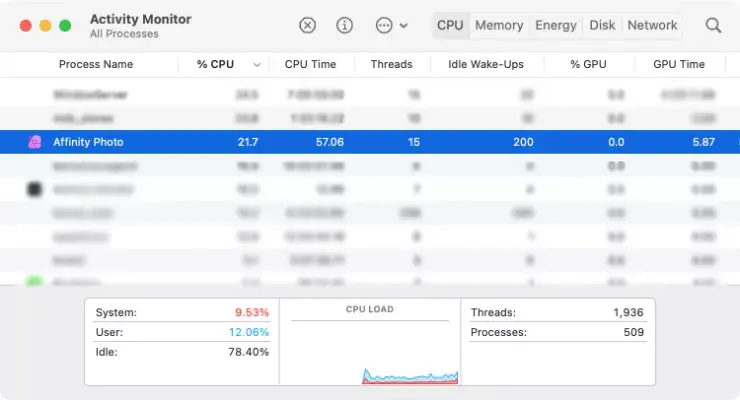
Method 4. Use Activity Monitor to Stop Rogue Processes
Rogue apps are the apps that does not work properly or sometimes get stuck on Mac but keep running in the background, result in consuming the system memory space as well as its processing power.
Step 1: Open Applications, from the Utilities folder, choose Activity Monitor.
Step 2: Navigate to CPU tab and then click the % CPU column to sort all processes by CPU usage.
Step 3: Now, view all the processes that is being used by CPU power and check if there is any way to stop it. Because if it won’t stop then it may affect the stability of the system.
Step 4: To pause the process, select the same and click X button that appears in Activity Monitor toolbar.
Step 5: Tap Quit/Force Quit to confirm.
Method 5. Clean Up your RAM using Terminal
Step 1: Go to Launchpad, from the Other folder, select Terminal.
Step 2: Enter the following command: sudo purge.
Step 3: Press Enter.
Step 4: Enter admin password and again press Enter to confirm.

Conclusion
In the write-up we have explained different techniques to fix “how to clean MacBook Pro hard drive”. Clearing the data from time-to-time help your Mac to run smoothly. Following the advice given will help you in clearing out the storage and removing unnecessary apps, files and other data will keep your Mac healthy and up-to-date. However, it is suggested to use a safe solution even if it is third party. For any queries, you may contact MacMister Support.

Safe solution to backup emails from 90+ webmail sources and allows to convert them into 15+ saving options.