USB Drives are beneficial for taking data backup. Formatting is the procedure that clears the existing stored data in USB drive and sets the file system that it will use. The file system tells the drive how to store the data that is written to, read, or deleted from it. The type of file system requires in USB Drive depends on the device type it will be used with.
Quick Note. Many device will show the alert message when you connect a USB drive with the incompatible file system that requires formatting. You need to refer to device documentation to find out the device compatible file system.
So, the guide will show how to format USB drive on Mac.
Different Types of USB Drives
The process to format USB Drives is the same but every USB drive comes in different physical forms.
- USB Flash Drive
- External Hard Drive or Solid State Drives
Method 1. Format USB Drive using Mac
Note. The entire USB Drive data will be destroyed during the process. Make sure that the drive is totally blank and if not, then move the data to a secure place before proceeding.
Step 1. Insert USB Drive in USB Port.
Step 2. The Mac system will detect the drive and display its icon on the desktop.

Step 3. Run Disk Utility:
- Click on Search icon appearing in the top-right corner.
- Enter “Disk Utility”. And select the option of Disk Utility from the search result.


Step 4. Choose the USB Drive from the left.

Step 5. Click on Erase option displaying on the top.

Step 6. Enter the name of the Drive, and select Format.

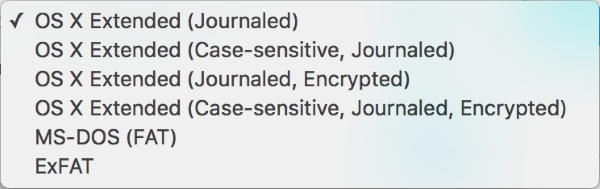
Step 7. Choose the required format type from the options given.
Step 8. Select Erase.
Step 9. A progress bar will appear of formatting drive appear. Wait until the process completes.

Step 10. Once complete, press Done button.

Step 11. Go to Disk Utility and select Quit Disk Utility.

Conclusion
The blog post has discussed the steps to safely format USB Drive on Mac. You can go with the above process or use the MacMister Data Wipe Software for Mac to quickly format the entire USB Drive data on any macOS platform. The application is powerful and will help perform the formatting process the way you want. It also has a trial edition that you can use to test the complete process for free.
- 1How to Backup Mac or MacBook?
- 2How to Backup Mac to External Hard Drive?
- 3How to Check Storage on MacBook Air?
- 4How to Backup iPad to External Hard Drive?
- 5How to Set Up Apple Watch without Pairing to iPhone
- 6How to Lock Whatsapp with Face ID in iPhone?
- 7How to Track Stolen iPhone using IMEI Number?
Erase your data permanently from your Mac machine. Get the trial edition now!