How to Migrate Mac Mail to New Mac?

There are different techniques available which will help you to migrate Mac Mail to New Mac. So, in the following blog we have provided both the solutions one is manual and other one is third party automated Mac MBOX Converter. One can use the suitable one and move Mac Mail to new Mac.
Also Read – Backup Apple Mail Data to PDF
Let us first discuss the manual approach and see how one can move mails to New macOS. Moreover, before proceeding with the steps, make sure you have taken backup of all your crucial files.
Method 1. Indirect Procedure to Migrate Mac Mail to New Mac
The indirect process includes two sub-methods –
- On the Old Mac
- On the New Mac
To move Mail to New Mac, first copy ‘On My Mac’ Email Folders
On the Old Mac
- Open the required folder appearing under ‘On My Mac’ in Apple Mac Mail on Mac OS. However, Mail will export sub-folders as well, if there is any. You can choose if you want to import them or not on a New Mac.
- Choose Mailbox and then Select Mailbox from the menu bar.
- Set a desired location that facilitates to move the created file on a New Mac. To save folders, one can choose iCloud, Google Drive or OneDrive, they will work well with the process. Also, one can go with external hard drive for the same.
- Hit Choose.
- Now, move recently created .mbox files to New macOS.
In case you don’t want to face any issues during copying, compress the files, right-click on .mbox file and select Compress “___.mbox” from the context menu.
On the New Mac
- Go to Apple Mail.
- Choose File and select Import Mailboxes from the list.
- Under Import Data from, select Apple Mail.
- Hit Continue.
- Highlight MBOX file.
- Hit Choose.
- Ensure all folders are selected that are required to import.
- Hit Continue.
- Press Done.
- Find imported folders available under Import in the ‘On My Mac’ section.
Now, Move All Mails of On My Mac to New Mac
- Go to Finder, press Command+Shift+G and type ~/Library/Mail/V8
Note. For Mail versions other than 14 and Mac OS other than Monterey, the folder will be stored with a different name i.e. V5 or V6 instead of V8.
- Hit Go.
- Go through the folders and find a file with .mbox extension.
- Highlight and copy all MBOX files to new system.
Note. To merge all files in a single document, right-click on .mbox file and choose Compress __ Items from the appeared context menu.
Also Read – Backup Apple Mail to External Hard Drive
Method 2. Direct Procedure to Migrate Mac Mail to New Mac
To directly migrate Mac Mail to New Mac, one can go with the automated solution and perform the desired task. The MBOX Migrator for Mac allows to instantly transfer all MBOX files into a new Mac computer. To test the software features and operational clicks, one can download free demo version and understand the whole process.
Steps to Directly Migrate Mac Mail to New Mac
Step 1. Download and start Migrator utility on Mac system.

Step 2. Load required MBOX files using Add Files and Add Folders and click Next.

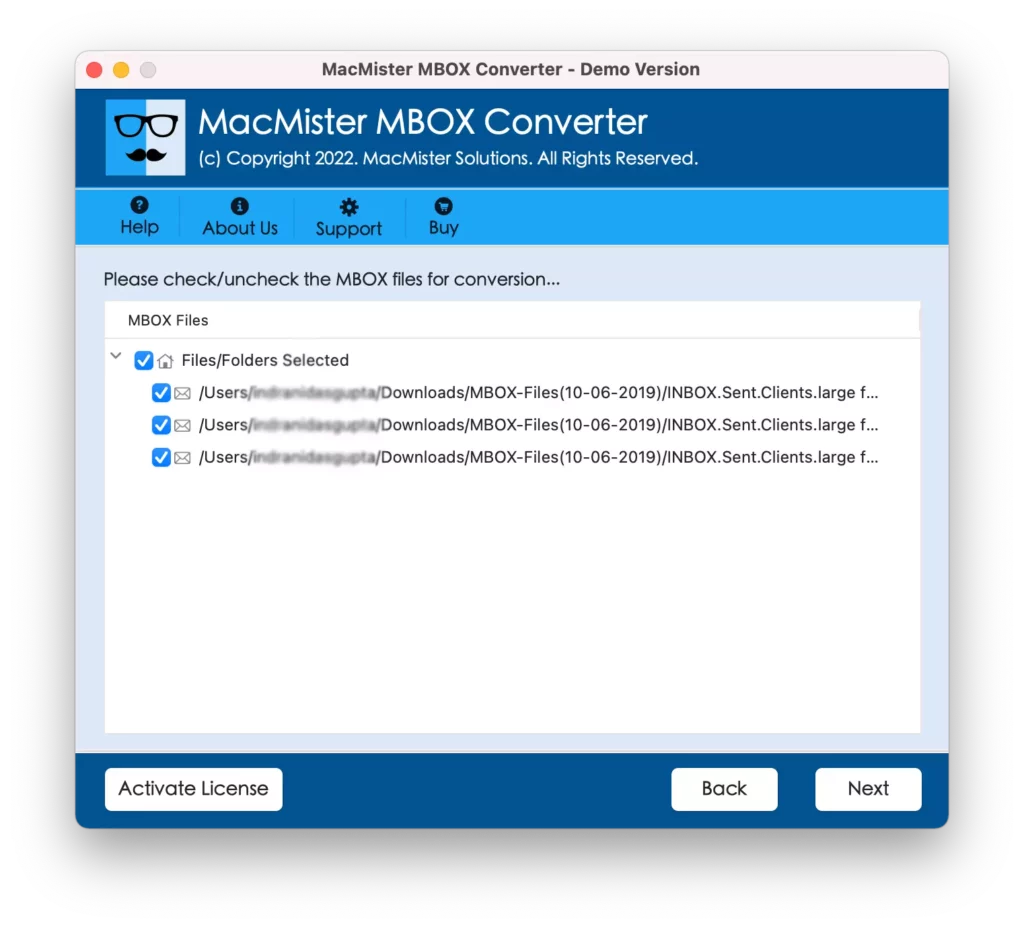
Step 3. Select the files to export by deselecting or selecting the checkboxes shown with loaded MBOX files. Press Next to continue.
Step 4. From Select Saving Option, choose desired file type of IMAP option for direct cloud migration. Simultaneously set the sub-options accordingly to get the desired output.
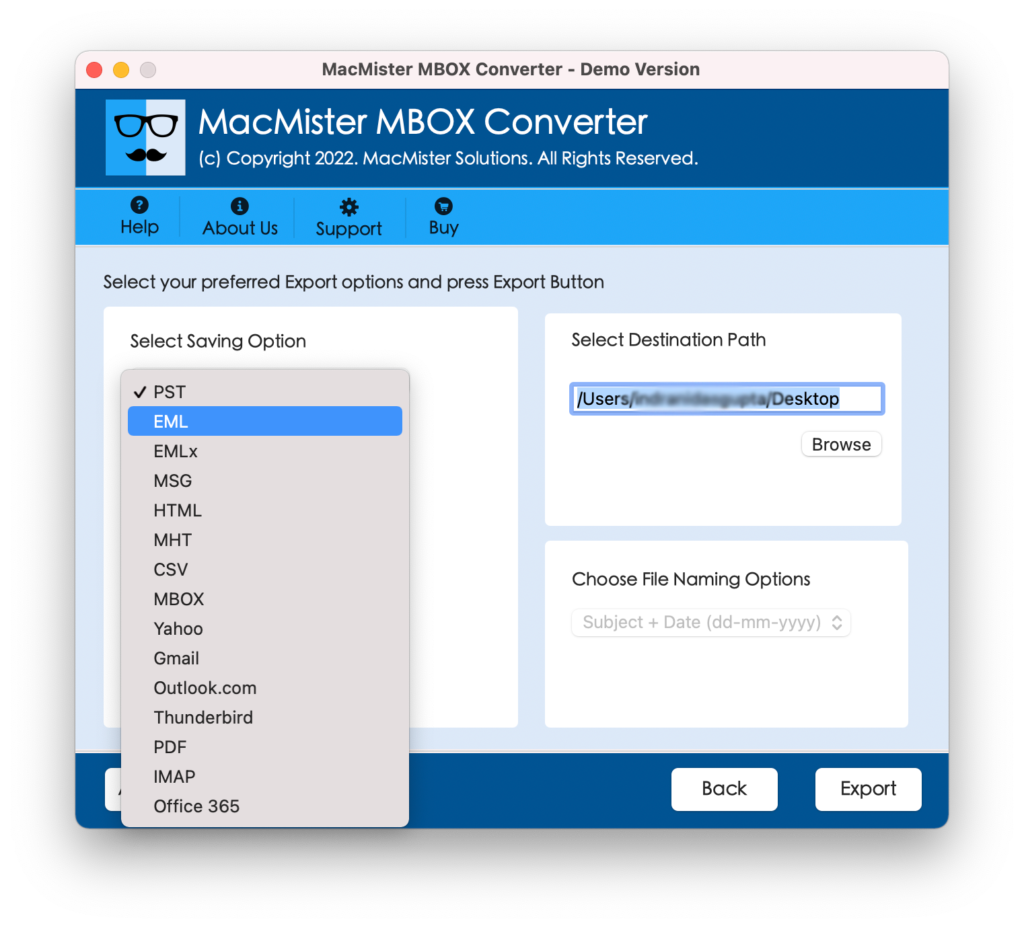
Step 5. Click Export. Tool will show Live Conversion report, click OK to exit.

Now, go to specified location and check the migrated data. The complete conversion will be performed without any alteration.
Conclusion
The complete post has discussed multiple procedures to migrate Mac Mail to new computer. A user can implement the desired process and carry out the task accordingly. In case you are a non-technical user, then you can go with automated solution as it is direct and offers three easy steps for successful migration.
Also Read – Import Mac Mailboxes to O365